
When it comes to ensuring your transaction runs smoothly, Content checks are the most valuable tools at your disposal. A well-used content check can make all the difference in a transaction. In general, the purpose of content checks is to verify that the previously executed action (e.g., clicking a link, logging in/out, navigating to a page) completed successfully. Since transaction monitors run using a script, adding content verification is invaluable to ensure the transaction runs smoothly and provides you with accurate information regarding your website.
Content checks are free, so we encourage you to use them! Content checks add value to your transaction monitor after any action that generates new content on the page.
Because a content check in your transaction script waits for the indicated content to load, you have two added benefits.
- First, you know for sure that the navigation ended on the correct page by verifying the presence of page-specific content.
- Secondly, you know for sure that the page loaded correctly and fully by waiting for the indicated element to finish loading. Verifying that the element finished loading helps to prevent the transaction from proceeding with the next action too quickly.
When to use content checks
In general, the purpose of a content check is to verify the successful completion of the previously executed action. You should add content checks after any action that changes the page’s content in any way. By using a content check, you explicitly test if specific actions in the script had the desired result in the browser. Examples of when to use a content check include:
- after entering credentials and clicking the “login” button
- after clicking on a product link on an e-commerce site
- after logging out
- after navigating to a new page
You should also use a content check to verify that an auto-completed text field worked, a table populated properly with data, or a script successfully ran.
Adding content checks
To add a content check:
- Open the transaction monitor that you want to change.
- Go to the Steps tab.
- Find the step where you want to add a content check action.
- Click the Add action button. Notice that the content check action types have a green “Test” label in the available actions list.
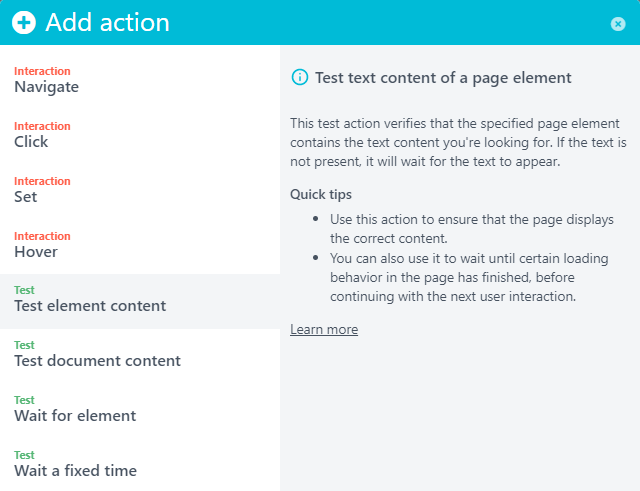
- Select the appropriate action type from the pop-up. After making your selection, the new action appears in the editor.
 This screenshot displays the Test element content action type.
 - Enter the settings as needed for your content check. The setting options vary depending on the action type selected. See the paragraph Content check types for information on the options per type.
- Click the button to save all changes.
The instructions above are for the visual editor. You can also add or change steps using the script editor.
Content check types
You have the option to choose between a number of separate types of content checks.
Test element content
For the Test element content test type, Uptrends checks a specific element on the page for content you specify. The Test element content check allows for more specific and robust checks compared to the Test document content type. For most purposes, we recommend you use the Test element content type. The Test element content type requires that you point to a specific element on the page using a CSS or XPath selector and define a content string the element should contain. Doing so leads to very robust checks that verify the successful completion of actions the script executes.
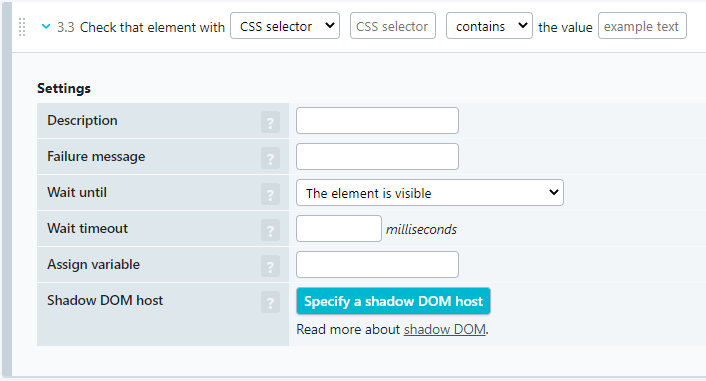
The Test element content action requires the use of a CSS or XPath selector to point to a specific element for which you want to check the content.

You use the drop-down menu to switch between the two selector types. You can find more information on selectors in the knowledge base articles Using selectors and Selector alternatives.
After selecting a selector type (CSS/XPath) and entering the selector, you choose a match condition from the following options:
- contains
- does not contain (see also Negative content checks)
- matches regular expression
- does not match regular expression (see also Negative content checks)
To finish the setup, in the example text field enter the text you’d like to check for in the indicated element.
The other action settings are optional.
Description — Add a description for your content check, such as “Test if the login was successful.”
Failure message — What to display if this content check generates an error, such as “Login was not successful.”
Wait until — Set the wait condition for this monitor check. Refer to the Wait for element article. Note: Wait Until isn’t available for the Test document content type.
Wait timeout — How long, in milliseconds, Uptrends should wait for the content to appear. The default is 30 seconds. For most cases, we recommend that you stick to the default. However, in certain cases, you may find that increasing the timeout useful. The maximum value for the wait timeout is 60 seconds. Be careful not to increase the timeout by too much, as there is an absolute upper limit to how long a complete transaction may take. Please note, increasing or decreasing the wait timeout does not affect any measured time metrics for the transaction.
Assign variable — Enter a variable name in the format {{name}}. See our article on using transaction variables for more information.
Shadow DOM host — lets you specify a shadow DOM host and even nested shadow DOMs.
If you’re working directly with the JSON transaction script in the script editor, the Test element content check type needs to have the following format:
{
  "testElementContent": {
    "value": "Example text",
    "testType": "Contains",
    "element": {
      "xpath": "[@id='exampleId']",
      "alternatives": [],
      "shadowRoots": []
    },
    "timeoutMs": 3000,
    "description": "Description of this action"
  }
}
If parameters are optional, like timeoutMs, description, and failureMessage, you can leave them out. The available testType parameter values are Contains, DoesNotContain, MatchesRegex and DoesNotMatchRegex. This example verifies that the (example) element with XPath selector //*[@id=’exampleId’] contains the string “Example text.” Of course, CSS works as well - use the value “css”:”#exampleId” instead of "xpath": "[@id='exampleId']".
Test document content
The Test document content type is the most straightforward one available. The Test document content type looks for the specified content anywhere in the page document regardless of whether or not the content is visible. Not all text that exists in the page document or DOM appears on the page. However, since the Test document content test type checks the HTML document rather than the page as the browser loads the content, you can check for “invisible” text. Since the Test document content type does not check the loaded page contents, you can’t use XPath or CSS selectors to point to a specific element. However, we do support using a regular expression to search for specific patterns in the DOM content.
If you choose to work directly with the JSON transaction script rather than use the visual editor, the Test document content check type needs to have the following format:
{
"testDocumentContent": {
  "value": "Example content in the DOM",
  "testType": "Contains",
  "timeoutMs": 30000,
  "description": "This check will test the page DOM for the specified content.",
  "failureMessage": "Example failure message"
  }
}
Please note, the timeoutMs, description, and failureMessage parameters are optional, so you may leave them out.
Wait for element
The Wait for element test type is identical to the Test element content type, except, in this case, the element does not need to contain any text content. You can use the Wait for element test type to check for empty elements, for example, <div> elements without any text in them, images, and buttons.
If you’re working directly with the JSON transaction script, the Wait for element check type needs to have the following format:
{
  "waitForElement": {
    "element": {
      "xpath": "//*[@id='exampleId']"
    },
    "timeoutMs": 30000,
    "description": "Verify that the element with the indicated XPath selector exists on the page.",
    "failureMessage": "Example failure message"
  }
}
Please note, the timeoutMs, description, and failureMessage parameters are optional, so you may leave them out.
Negative content checks
Instead of verifying that specific content does exist in the DOM or appears on the page, you may need to verify that certain content does NOT exist on the page. For example, you may wish to get an alert if a certain error message appears on your page. To test that specified content does not appear on the page, use negative content checks. If the specified content appears on the page, the monitor errors.
To use a negative content check, add either a Test document content or Test element content check type. Then, set the matching condition from the default value of contains to either does not contain or does not match regular expression.
When using a negative content check, if the transaction encounters the specified element or content, the transaction stops and returns an error. If the element or content does not appear, the transaction continues as normal.
Content check quality
To ensure the best results from your content check, select a unique element on the page that contains unique text that resulted from the previous action. A useful content check is a definitive and exclusive test of an action, and for most Test element content checks, it comes down to testing for a combination of a robust and unique selector and text value.
Text value
Picking a unique text value to test for is key for both the Test element content and Test document content check types. The need to pick unique text values does not apply to the Wait for element check type because the test doesn’t test for text values.
When selecting the text for the check, make sure the text is a direct consequence of the previous action. For example:
- After clicking a login button or logout link, you could test the subsequent page for the presence of an account name or the corresponding logout or login link.
- After clicking on a link to go to a product page, test for product specifications or an add to cart button.
- Look for a link on the new page that you need for the next step.
Do not pick text that shows up the same on every page. For example, do not use footer text. Footer text tells you nothing about the progression of the transaction.
Use regular expressions where applicable. For example, if after performing a search action, your page reads “15 result(s) found,” set a content check for .* result(s), found, and set the content check condition to matches regular expression.
After picking the text for your check, make sure you formulate a unique and robust (resistant to changes on the page) CSS or XPath selector.
Selectors
Picking a robust and solid selector is key for both Test element content and Wait for element test types. Since pointing at a specific element is not an option for the Test document content test type, this paragraph does not apply.
A good selector is unique on the page. Using a unique value allows you to be certain Uptrends is looking at the correct element. Where possible, use the element’s id attribute, as these should generally be unique to that specific element. For example, //*[@id=’testId’] or #testId.
Read more about selectors in the knowledge base articles Using selectors and Selector alternatives.
Caveats, pitfalls, and tips
Keep case sensitivity in mind. With the use of CSS, text can (and does regularly) appear as all caps on the page, while it uses sentence case in the DOM. That means the selector could read //span[text()='Hello'], but the text on the page could read “HELLO.” The selector should reflect the information in the DOM, and the string you enter for matching should reflect what’s actually on the page.
Some pages use dynamic IDs for their elements. For example, we could record a click on a span that shows up in the DOM as
<span id="example-12345">.
However, after a page reload, this exact same element would show up as
<span id="example-12789">.
Use XPath to handle dynamic IDs. For example,
//span[contains(@id,'example-')].