
Once you have created a custom dashboard that displays your monitoring data in a way that best suits you, it seems only natural that you might want to share it with your colleagues. In this article, you find instructions on how to do that.
Sharing a custom dashboard
To share a custom dashboard:
-
Open the dashboard you want to share.
-
Click the icon in the quick action menu. The dropdown menu opens.
-
Select the option.
-
You will then be prompted to choose how you would like to share your custom dashboard:
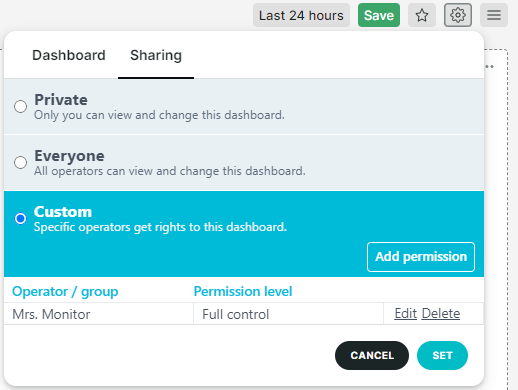
Private — Only you can view and change the dashboard.
Everyone — All operators can view and change the dashboard.
Custom — Specific operators get rights to the dashboard.
Tip: You can also click on the gear icon (next to the hamburger icon) to open the dashboard settings, then select the Sharing tab. -
If you choose Custom, you will see a list of operators (and operator groups) currently given permissions to the dashboard in question. You can edit or delete these existing permissions, or click to include another operator or operator group.
-
When you add a permission, you will be prompted to select the operators or operator groups you’d like to give permissions to.
The permissions options are view only or full control, which allows an operator to view and modify the dashboard. -
When you are done with all changes, click .
-
Click above the dashboard.
Exporting data from a custom dashboard
Another way of sharing information from dashboards is to export (manually or scheduled) the data by download or sending emails. This job can be scheduled. Please see the article Exporting dashboard data to find out the details.
When you use data exports, the information becomes available outside the Uptrends app. That way you e.g. can inform your customers (when scheduled, on a regular basis) without giving them access to the app.