
What are escalation levels?
The Uptrends alerting system was built with teams in mind. With customizable escalation levels that help you make sure that the right people are alerted about a potential issue, at the right time.
An escalation level contains a series of parameters for alert generation, number of reminders, notification method, and who will receive it. They can be configured in an alert definition.
You can configure up to three escalation levels, and generate alerts based on your own rules:
- Generate an alert when errors occur for a specific period of time or when a specific number of errors have occurred
- Define how many reminders are sent within a certain interval
- Set alert methods by using integrations
- Add a custom message (for Slack, PagerDuty, and email notifications only)
- Include a traceroute log in emails
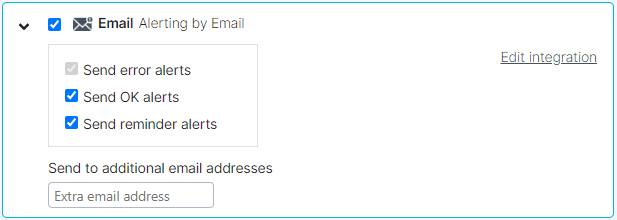
- Add an extra email address to alert additional people
- Select which operators or operator groups get the alert
- Decide (for each integration) if you want to send OK and reminder alerts
Setting up an alert escalation
Within each alert definition, you have one to three escalation levels. To set up your escalations:
-
Go to and select an alert definition to modify. Alternatively, search for a specific definition in the Uptrends menu search bar. If you have to create a new alert definition, check out Creating alert definitions.
-
Open the Escalation Level 1 tab.
-
Select the Active check box if not already selected.
-
Set the rules for the Escalation by filling in the Generate an alert when parameters.
-
Set the frequency of the reminders. Learn more in the knowledge base article Alert reminders.
-
Choose one or more Alerting by integrations options, e.g. the predefined Alerting by E-mail, SMS (SMS/Text uses message credits) or Phone integration.
-
If you have configured other integrations you can choose them here. Visit the knowledge base article Integrations for more information.
-
For most integrations you can decide whether you want to receive OK alerts and reminders. Expand the integration by clicking the arrow > in front of the integration and activate the corresponding options.
Note that custom integrations use message types to deal with different alerts (error, reminder, OK). The arrangements you made in the message types will be shown in the alert definition, but cannot be changed there. Instead you have to make any changes in the custom integration itself.
-
Add a custom message (optional and only applies to some integrations).
-
Select the Traceroute check box to receive a traceroute log within the emails.
-
Use the Groups and operators section to select the operators for the escalation. Remember that alerts go out only if the designated operator is active and on-duty. Active is a main setting for an operator and on-duty is derived from the operator’s off-duty schedule.
-
Set up escalation levels 2 and 3 if your organization’s escalation path calls for it.
-
Click the button when you are finished configuring your levels.
Alerting by integrations
The knowledge base article about Integrations tells you more about the different types of integrations, which include phone (uses message credits) and other integrations like PagerDuty, Microsoft Teams, Slack, and StatusHub.
Testing alert configurations
Once you have set up your escalation levels and added the integrations you want to use, you can test if messages are sent succesfully. Check out the knowledge base article Testing alert messages for the methods available for different integrations.