
Many APIs require the client to provide credentials that verify identity and grant access. Common approaches include HTTP authentication schemes sent in headers (Basic, NTLM, or Digest), token-based access (such as OAuth 2.0, where an access token is obtained and then sent typically in an Authorization header), mutual TLS with a client certificate, or a combination of these methods.
This article discusses the HTTP header and token-based authentication options in Uptrends. To authenticate using client certificates, see Client certificate authentication.
Default authentication types
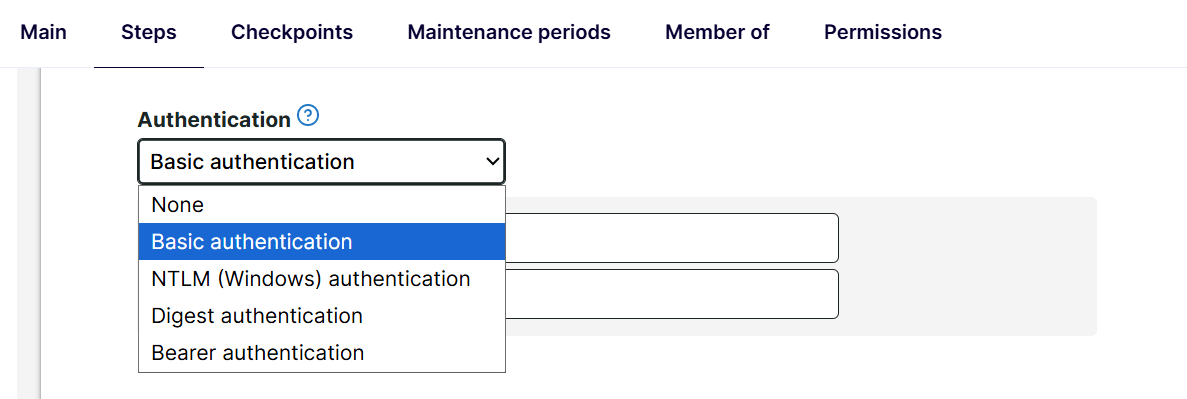
The Authentication section on the Request tab offers several ways of sending credentials:
- Basic authentication
- NTLM (Windows) authentication
- Digest authentication
- Bearer authentication
- None — select this option if the step does not require authentication.
Basic authentication
Uses a username and password for authentication. Uptrends automatically generates the Authorization header. You do not need to add this header manually.
Uptrends may first call the API without sending your username and password. If authentication is required, the server refuses access and requests Basic authentication. This scenario is called a challenge: the server responds with 401 Unauthorized and a WWW-Authenticate: Basic header.
Uptrends then retries the API call with your username and password. It combines your credentials as username:password, Base64-encodes the result, and sends it in the Authorization header. Even if Uptrends makes multiple API calls, this still counts as one monitor step.
Note
If the server returns
403 Forbiddenor a missingWWW-Authenticate: Basicheader, the monitor returns an error. Manually add the headerAuthorization: Basic dXNlcm5hbWU6cGFzc3dvcmQ=to the monitor step, so that the credentials are passed along even without a proper challenge. For the header format, see the Basic authentication scheme (RFC 7617).
NTLM (Windows) authentication
Uses Windows or Active Directory username and password for authentication. Uptrends automatically generates the Authorization header. You do not need to add this header manually.
Uptrends may first call the API without sending your credentials. If authentication is required, the server refuses access and requests NTLM authentication. This scenario is called a challenge: the server responds with 401 Unauthorized and a WWW-Authenticate: NTLM header.
Uptrends may then send several HTTP requests to verify your identity before the API call succeeds. Even if Uptrends makes multiple API calls, this still counts as one monitor step.
Note
If the server returns
403 Forbiddenor a missingWWW-Authenticate: NTLMheader, the monitor returns an error. Unlike Basic authentication, there is no simple manual header workaround. If your account is in a Windows domain, enter the username asYOURDOMAIN\username(for example,ACME\john).
Digest authentication
Uses a username and password for authentication. Uptrends automatically generates the Authorization header. You do not need to add this header manually.
Uptrends may first call the API without sending your credentials. If authentication is required, the server refuses access and requests Digest authentication. This scenario is called a challenge: the server responds with 401 Unauthorized and a WWW-Authenticate: Digest header.
Uptrends then retries the API call. It computes an MD5-based response from the username, password, server challenge, request method, and URL, and sends it in the Authorization header. The password itself is never sent. Even if Uptrends makes multiple API calls, this still counts as one monitor step.
Note
If the server returns
403 Forbiddenor a missingWWW-Authenticate: Digestheader, the monitor returns an error. Unlike Basic authentication, there is no simple manual header workaround.
Bearer authentication
Uses a bearer token instead of a username and password. Uptrends automatically adds Authorization: Bearer <token> to that step’s API request. You do not need to add this header manually. Unlike other authentication types, no server challenge is required.
Note
Use Bearer authentication when you already have a token. Use Custom authentication (OAuth) when you need to obtain a token first, or when the token comes from a previous step’s response.
Variable support
The username and password fields support variables. You can create predefined variables (for example: {{username}} and {{password}}) with the appropriate values and then use those variable names in the authentication fields.
You can also use vault items for credentials.
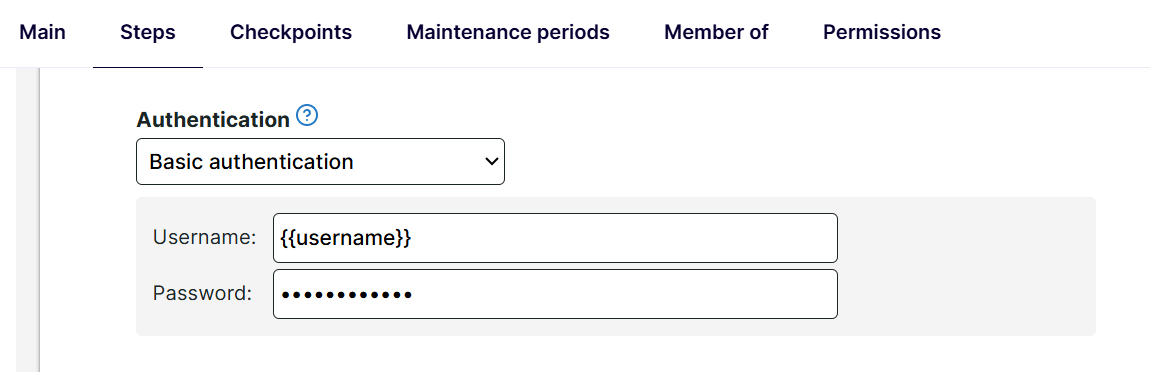
For instructions on how to use predefined variables, see Multi-step API variables.
Custom authentication (including OAuth)
Note
Use Bearer authentication, when you already have a token. Use custom authentication (OAuth), when you need to obtain a token first or a token comes from a previous step’s response.
When your API uses OAuth as its authentication protocol, you’ll need a more elaborate setup. Depending on your API, you may need something quite specific to your situation. OAuth 2.0 in particular uses at least one separate request just for the authentication process. This request requests access to the API (using one of the default authentication types, by specifying login credentials in the URL, or even performing a web page login). Upon successful authentication, the OAuth access token is captured and stored in a variable, so it can be used in subsequent requests.
If you’re not using OAuth but a different protocol, it may still operate in a similar way: you’ll first have to specify login information that “proves” your identity to the API. The API server will then respond by giving you a login token that is valid for a certain amount of time. By capturing that token and storing it in a variable, you can execute a sequence of requests that use the login token to gain access.
Setting up OAuth 2.0 authentication
In the following example, we’ll set up a simple form of OAuth 2.0 authentication. Our goal is to acquire an access token from the API, which we can then use in later requests.
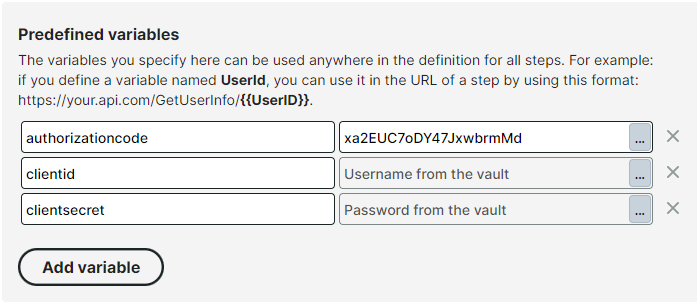
To do this, we will first send a request containing the appropriate OAuth fields. In this case, we’re requesting access based on an authorization code, a client id and a client secret. The client id and client secret are fixed values that we can define as predefined variables. In our simple setup, the authorization code will also be a fixed value, but in your setup it may be necessary to retrieve that authorization code first using a separate step.
First, we’ll add those values to the predefined variables:
With those variables defined, we can now set up a request to our API by including references to those variables, along with any other parameters the API expects. In the first step of our multi-step setup, add this URL:
GET https://myapi.com/oauth/token?grant_type=authorization_code&code={{authorizationcode}}&client_id={{clientid}}&client_secret={{clientsecret}}
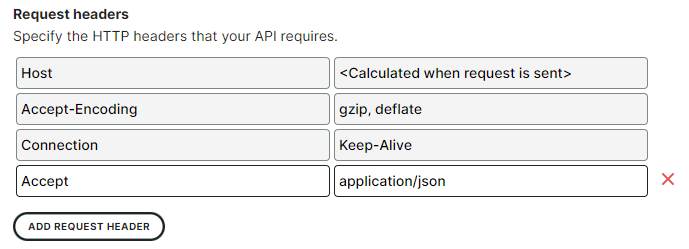
We expect the API to return a data structure that contains the access token we need, but how will that data structure be formatted? To ensure we will get JSON-formatted data, let’s tell the server we will only accept the application/json format by specifying that in an HTTP header:
With this header specified, we can now expect the response to look something like:
{ "access_token":"SGV5ISBZb3UgZm91bmQgdGhpcyB0ZXh0IQ==", "token_type":"Bearer", "expires_in":86400 }
All we need to do now is capture the access_token field in the JSON response. To do this, we’ll create a new variable in the Response tab of our step:
- The response should contain JSON, so choose
Response body as JSONas the source for our variable. - Since the
access\_tokenattribute is located at the top level in our data structure, our JSON expression is simplyaccess\_token. - We’ll choose
accesstokenas our variable name. This is the name we’ll refer to in later steps.
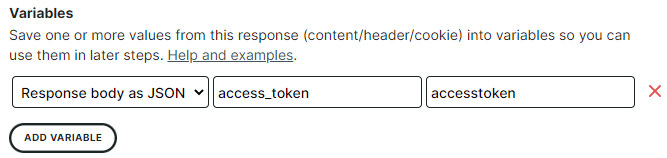
Even though the main goal of this first step is to capture the access token, it already performs some monitoring as well: if the API returns an error at this point, or if the response does not contain an access token, this step will detect this and report an error.
Now that we have a valid access token, we can finally access the actual API method we want to check (say, for retrieving a list of products). Create a new step to define this API call. After specifying the method and URL for this new request, we’re going to pass in the access token we’ve just captured. OAuth 2.0 based APIs expect an HTTP header called Authorization, with a value Bearer {{accesstoken}}
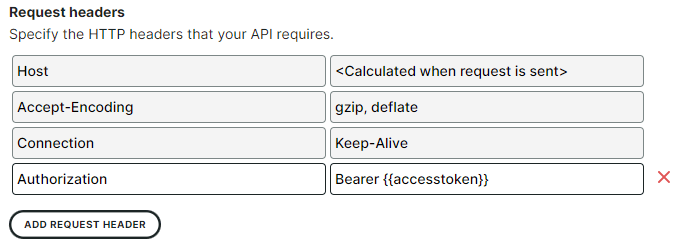
We can repeat this for each additional step that requires the same access token.