
Set up Single Sign-on
To establish a connection between your Identity Provider (IdP) and Uptrends:
-
Configure the SAML connection with your IdP — required for all SSO setups.
-
(Optional) Set up SP-initiated SSO — only if operators should start login from Uptrends instead of your IdP portal.
IdP-initiated and SP-initiated SSO describe different login entry points, not separate SSO systems. Both use the same SAML configuration.
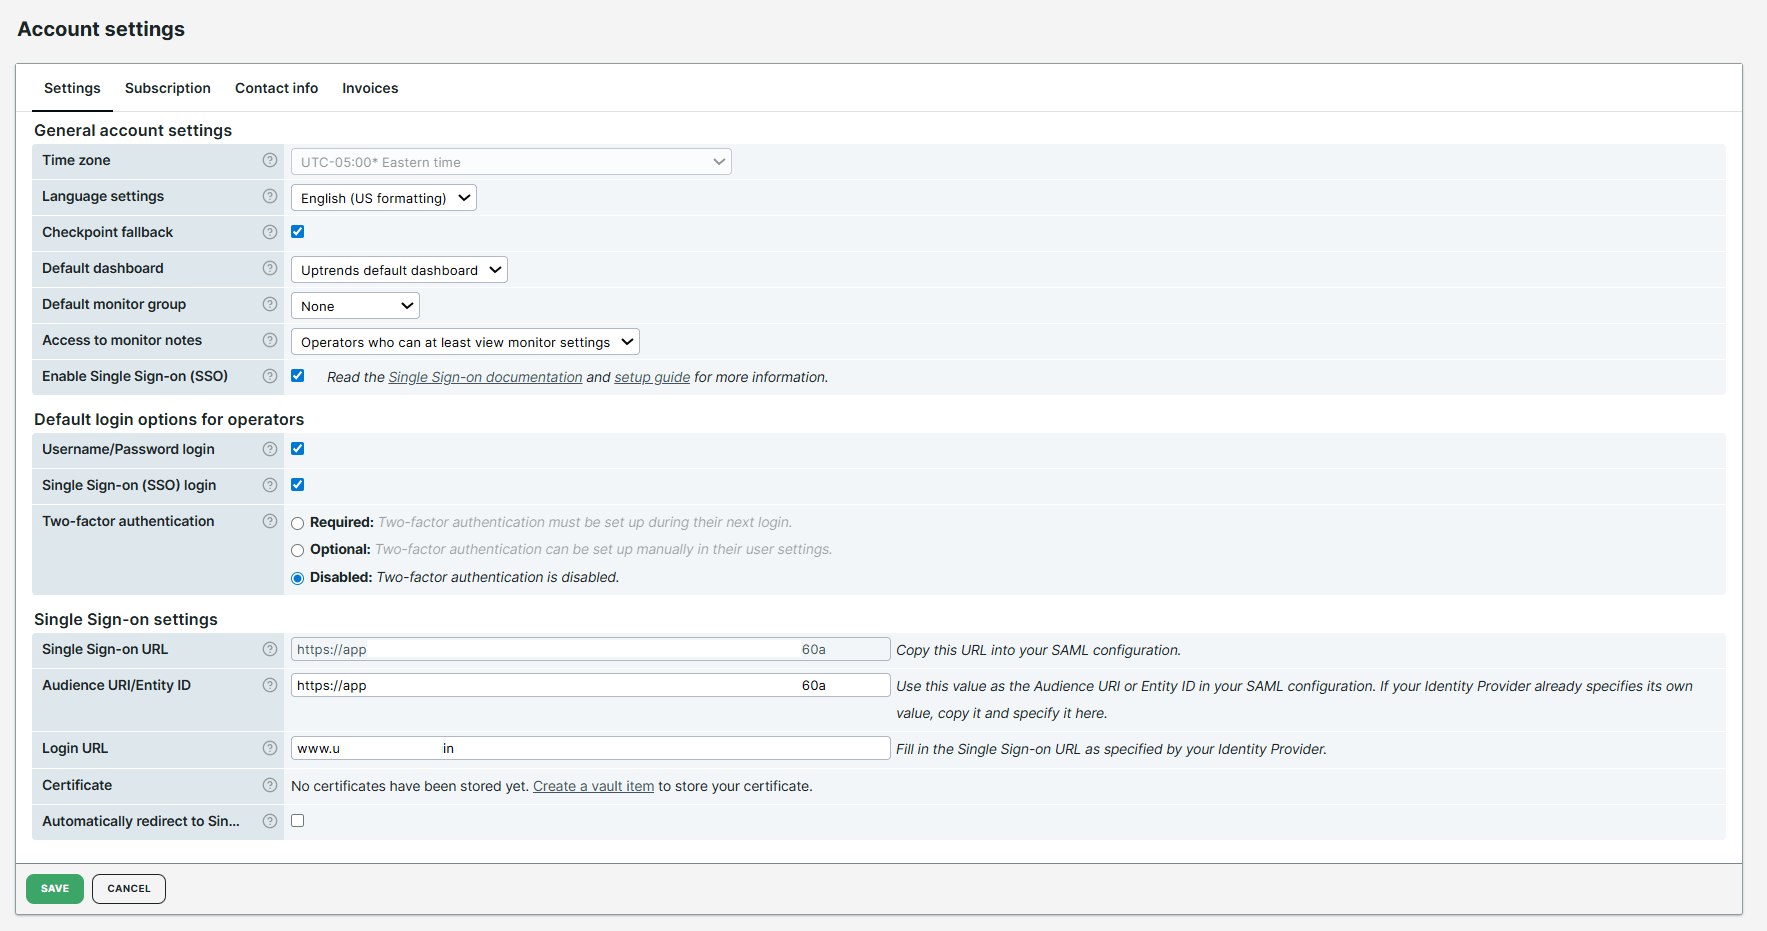
Enable SSO in Uptrends account settings
To enable Uptrends SSO account settings, log in to your Uptrends web application and follow these steps:
-
Go to Account settings > General account settings and select Enable Single Sign-on (SSO).
-
In the Default login options for operators, enable Single Sign-on (SSO) login.
-
In Single Sign-on settings, copy the predefined Single Sign-on URL for use when configuring the SAML endpoint in your IdP.
Configure the SAML connection with your IdP
Configure the SAML connection between Uptrends and your identity provider. This is the required setup for all SSO-enabled accounts.
Operators sign in through your IdP portal (IdP-initiated SSO). The same configuration also supports SP-initiated login if you complete the optional steps in the next section.
To configure SAML SSO between Uptrends and your identity provider, follow these steps:
-
Log in as an administrator to your IdP.
-
Set up a new SAML-based application. Configure the following settings, if applicable:
a. Configure the SAML connection as IdP-initiated.
b. If required, specify Microsoft IIS as the service provider’s web platform
c. Specify the SAML endpoint. Use the value of the Single Sign-on URL provided in the Uptrends web application.
d. Specify the audience URI or entity ID. If your IdP provides this, copy that value and paste it to the Audience URI/Entity ID field in the Uptrends web application. Otherwise, use the URL that Uptrends provided.
e. Specify email or email address as the field used for authentication (Name ID format).
-
After you complete the setup, your IdP provides the SAML configuration data Uptrends needs to establish an SSO connection.
Depending on your IdP, you receive the IdP Single Sign-on URL and certificate data (X.509 public key) directly, or as a downloadable XML metadata file containing both values.
-
If your IdP provides the URL and certificate directly, copy the IdP Single Sign-on URL into the Login URL field in Uptrends account settings.
-
If you receive an XML file:
a. Locate an XML node similar to the following. Use the
Locationattribute value as the value to the Login URL field in the Uptrends web application.<md:SingleSignOnService Binding="urn:oasis:names:tc:SAML:2.0:bindings:HTTP-POST" Location="https://your-idp.your-organization/your-app" />b. Locate an XML node named below. The Base64-encoded data is the certificate data you need to store in the Uptrends Vault.
<ds:X509Certificate> <!-- Base64-encoded data --> </ds:X509Certificate> -
Store the certificate data into the Uptrends Vault.
a. In the Uptrends web application > Account settings > Single Sign-on settings, click Create a vault item in the Certificate field. This opens a page to add a new vault item for storing your certificate data. For instructions on creating a vault item, see Uptrends Vault.
b. Navigate back to the Account settings page and refresh.
c. The vault item now appears on the page.
If you need a certificate rollover, for example, if a previously uploaded certificate is due to expire, and you need seamless transition to the next, use all vault items inside a vault section. Then, select the option Scan this entire section to find the appropriate certificate from the Certificate dropdown menu.
- Click Save to confirm changes.
Your SSO setup is now complete. Verify the connection by logging in to Uptrends through your IdP portal.
Set up SP-initiated SSO
SP-initiated SSO lets operators start login from Uptrends instead of your IdP portal. Complete this section only if your organization does not use an IdP app gallery, or if you want operators to bookmark Uptrends directly.
After you configure the SAML connection, follow these steps:
-
Confirm that our Support team has configured your dedicated subdomain such as
https://your-company.uptrends.com. -
After the subdomain is configured, operators can bookmark the subdomain URL or enter your organization name on the Uptrends login page to start the authentication flow with your IdP.
-
(Optional) Enable Automatically redirect to Single Sign-on (SSO) login in Uptrends account settings to automatically redirect operators to your IdP when they visit your subdomain. This setting requires SP-initiated SSO and a dedicated subdomain.
-
Click Save to confirm changes.
Verify the connection by visiting your subdomain or the Uptrends login page.
Troubleshooting
For troubleshooting and further guidance, contact our Support team.