
The transaction step editor is needed to edit the steps and actions of a transaction script and can be used as the visual editor that has a UI allowing you to add and edit steps or the script editor that that is a plain text editor.
If you feel comfortable with writing your own script, check out Scripting source code directly to learn more about the script editor.
In most cases you won’t write a script, but rather use the transaction recorder to make a first set-up of your script and then use the step editor to fine-tune the transaction.
Steps and actions
The script of a transaction monitor contains steps (of the transaction you want to monitor). Inside the steps you find actions, which are the micro-steps in your transaction.
To edit the steps and actions:
- Go to .
- Open the Steps tab.
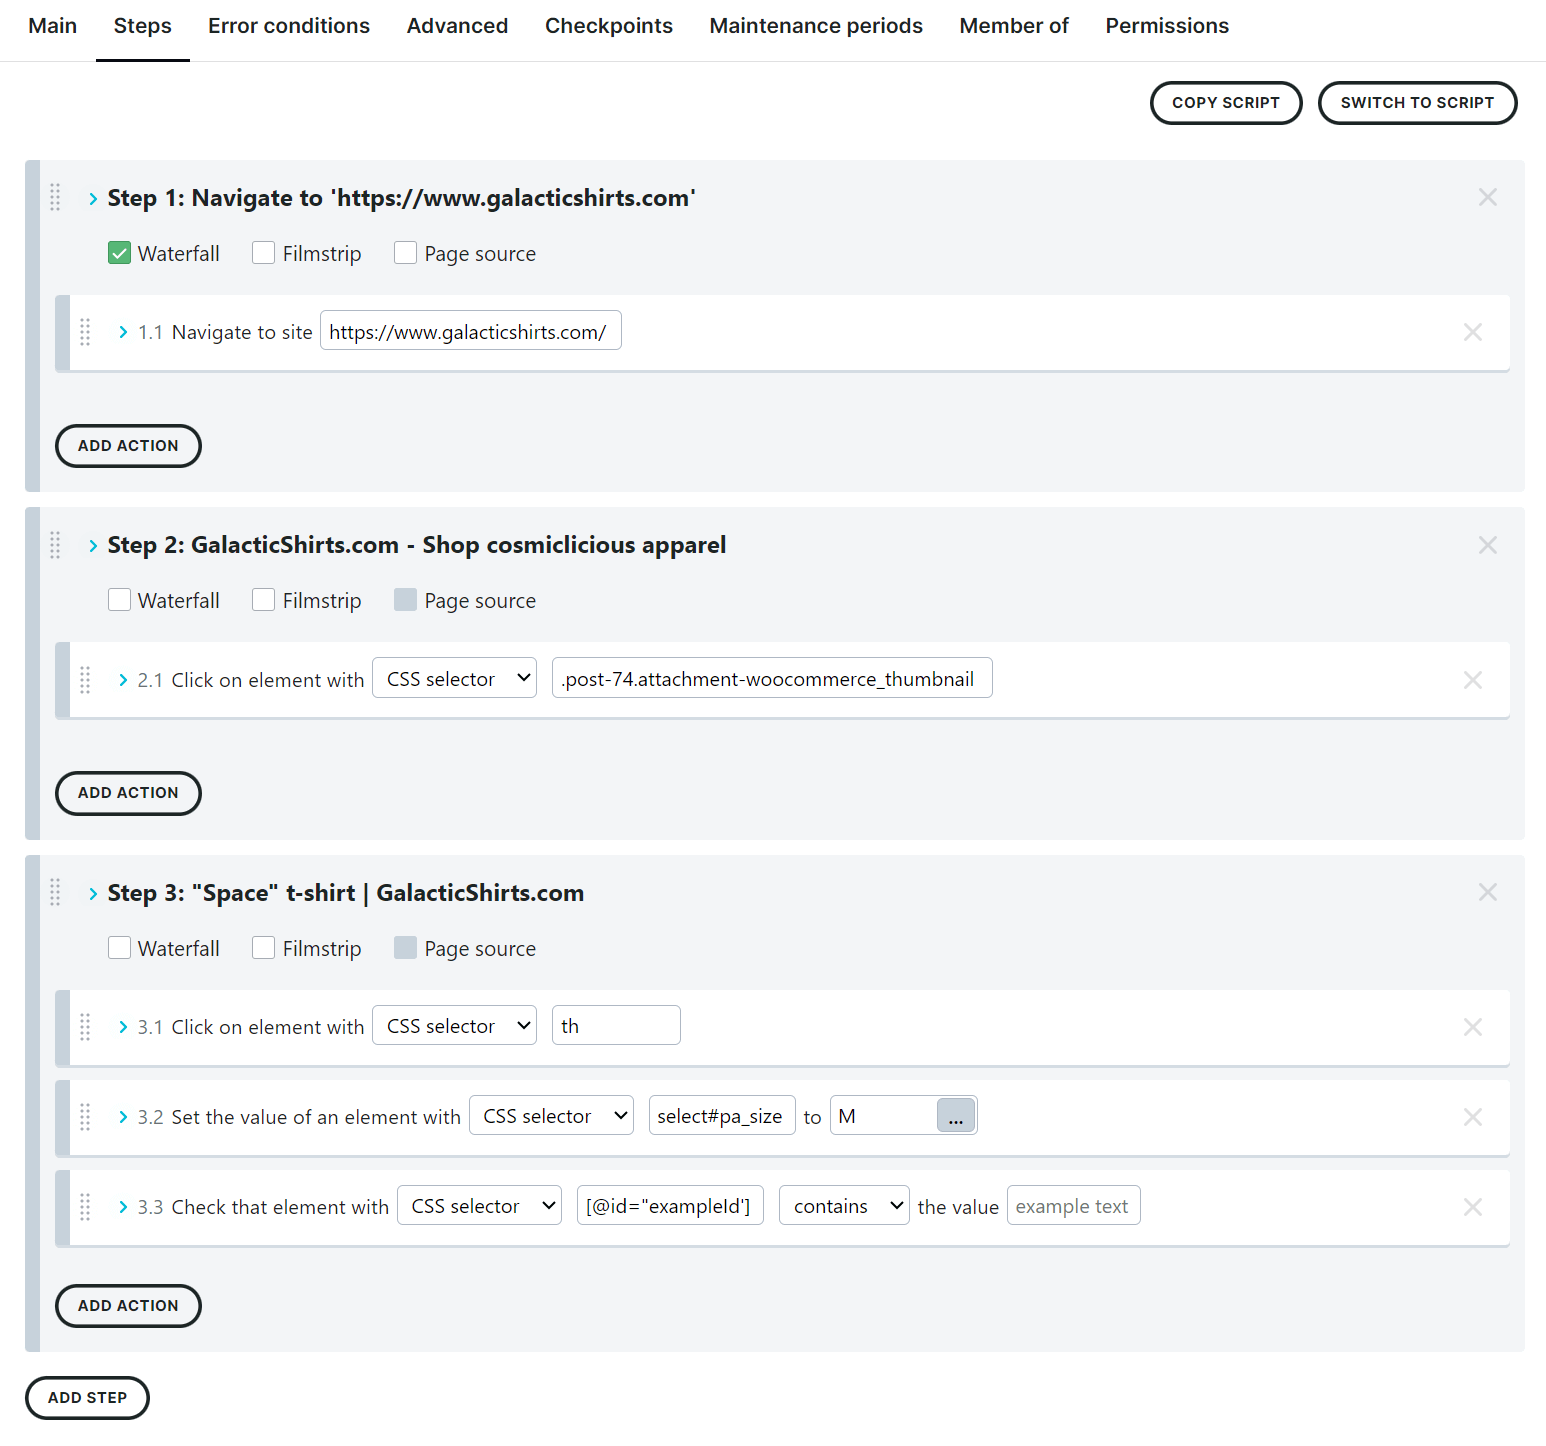
You refine and test your transaction script in the Steps tab, or you can write your script from scratch here as well. Notice the SWITCH TO SCRIPT button at the top right of the editor for this purpose.
If you uploaded your script from the transaction recorder, you should see one or more steps with actions already defined. If you’re creating your script from scratch, you will build out each step in your transaction using the step editor. It is recommended to use the transaction recorder to give you a good basis to start from.
Your transaction script is made up of steps and actions. Let’s take a closer look at what we mean by steps and actions.
What is a step?
When you upload your script from the transaction recorder, Uptrends automatically defines your steps for you, but what is a step? A step is an arbitrary grouping of actions in your transaction script. Typically, you want to group user interactions with your page into steps that end with a server request such as a form submit. Grouping actions by server submits/requests helps with troubleshooting and performance reporting.
You could also think of a step as a state transition in the browser, i.e., an action that results in a new page or refreshes the page with new content. But really, you can set up your steps to reflect whatever grouping makes sense to your use case and your reporting needs.
Step settings
Click the arrow > icon beside the step name to access the step actions and settings.
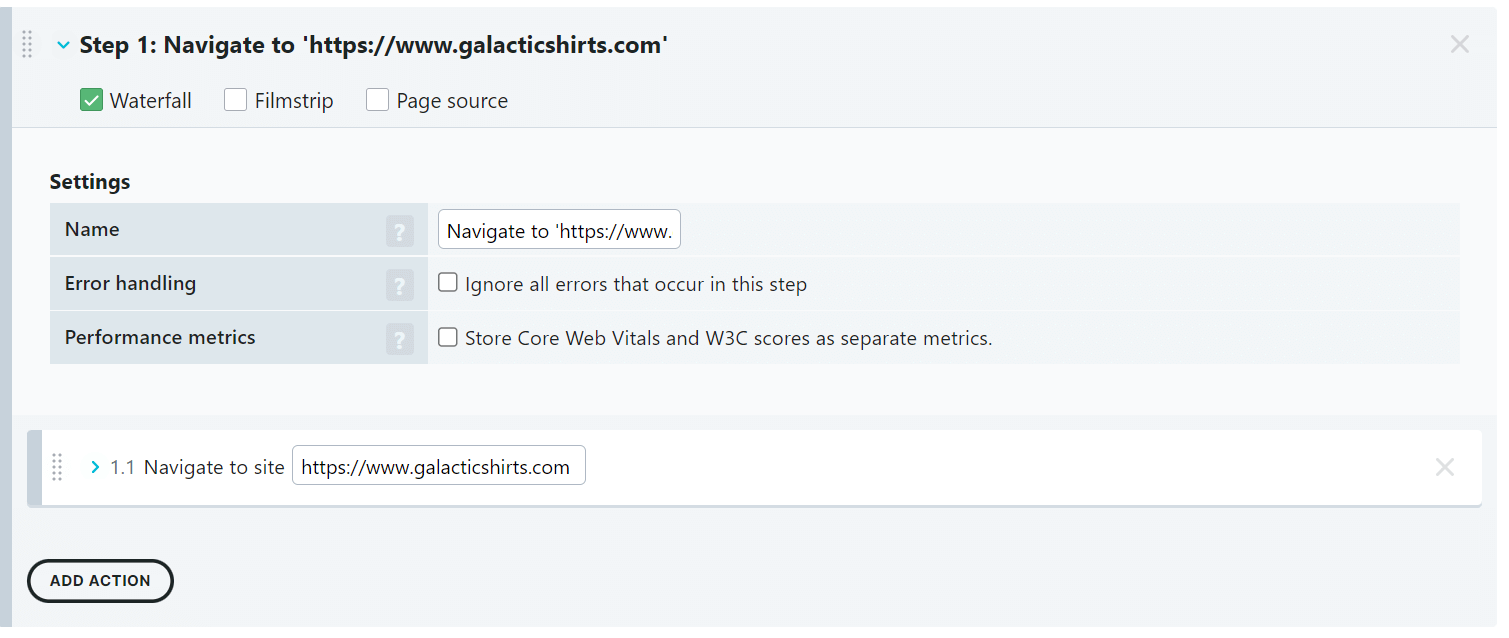
Within each step, several settings are shown:
-
Waterfall - You can add an optional Waterfall report to show the page load, Core Web Vitals, and W3C Performance metrics of any transaction step. Each Waterfall report uses one transaction step credit. To enable this setting, check the Waterfall checkbox and adjust the following according to your needs:
-
Name — specify a descriptive name for each step. For example, Add to cart, Login, or Request appointment time.
-
Error handling — if you wish to continue executing your transaction steps or scripts with page errors, you can do so by checking the Ignore all errors that occur in this step option. Uptrends continues to the next step regardless of the result from the current step. Your Check details screen shows the error, but the Transaction monitor continues despite the error. For more details, refer to Using ignore errors for optional steps and actions.
-
Performance metrics - check this option to enable and Store Core Web Vitals and W3C scores as separate metrics in your Transaction monitors. This option allows you to display such metrics in your Simple data or list custom report tiles when you click the icon.
-
-
Filmstrip - You can add optional Timeline screenshots (also known as a filmstrip) on a per-step basis. A filmstrip uses one transaction step credit unless there is already one screenshot in the step. In that case, the filmstrip is provided free of charge.
-
Screenshot - An optional screenshot lets you see the screen as experienced by your user at the end of the step. You can enable a single screenshot by adding the Control action Screenshot. A screenshot uses one transaction step credit.
-
Page source - Choose this option to get the page source information and any console log data that was generated during the execution of that step. Note that the page source is available only in combination with the waterfall.
Adding steps
To add a new step to your script:
- Scroll to the bottom of the Steps tab.
- Click the ADD STEP button.
- Name the new and currently empty step.
- (Optional) Grab the step by clicking on the handle (dotted vertical lines at the top left of the step) and drag the step to the desired location in the sequence within the script.
- Add actions. You find more information on actions in the next paragraph.
- Click the button to save your changes.
What is an action?
Actions are your user interactions, content checks, and browser interactions that happen within a step. They are divided into the categories Interaction, Test, and Control.
Interaction
The actions of type Interaction are in short:
- Navigate — go to a specific URL
- Click — locate a page element like (radio) buttons or checkboxes and perform a mouse click
- Set — locate and fill a text field, text area, password field, etc.
- Hover — find an element and hover the cursor over the element to reveal other hidden page elements
- Key event — perform a single key press, e.g. an element does not have a clickable button
These are described in detail in the knowledge base article Page interactions.
Test
The Test type actions are either content checks or enter a wait action.
- Element content — find and check an element for specific content
- Document content — check the entire page document for specified content
- Wait for element — look for and wait for a specified page element
- Wait a fixed time — add a custom wait time
Refer to the the knowledge base articles Content checks in transaction monitoring and Using wait conditions to learn what they do actually.
Control
The action category Control contains the following options:
- Screenshot — take a screenshot of the current screen
- Switch browser tab — give focus to the new window/tab, if your page opened another browser window
- Switch frame — allows you to switch between iFrames on your page
- Scroll — find a page element and scroll to the position on the page (especially helpful when using screenshots)
- Adjust variable content — change an existing variable with the Adjust variable content action
- Clear browser cache — clears the browser cache to reload page elements directly from the server instead of the browser cache
Adding an action
To add a new action to one of the steps in your transaction monitor:
- Open the step that you want to add an action to.
- Click the ADD ACTION button.
The Add action pop-up opens:
 Hovering over the action option gives you more information about that action.
 - Click the action that you want to add to your step.
- (Optional) Reorder the actions, if necessary. Grab the action by clicking on the handle (dotted vertical lines at the top left of the action) and drag the action to the desired location in the actions sequence. You can also drag the action to another step, if needed.
- Click the button to save your changes.
CSS selectors and XPath queries
You may have noticed that some of the actions show CSS selectors or XPath queries. These tell the transaction monitor exactly which screen element it needs to interact with to complete the action. If you used the transaction recorder, it has already picked what it thinks is the best method for locating an element on your page as described in the knowledge base article Transaction recorder selector determination.
However, the algorithm doesn’t always pick the best option in all cases, but you can find the other options the recorder chose by clicking the button in the selector value field.
Another option is to write your own selectors or queries. Learn more about CSS selectors or XPath queries. When defining the selectors manually you can make use of automatic variables. This gives you even more flexibility in the selector choice.
If you’re not comfortable with CSS selectors and XPath queries, we suggest that you contact Uptrends Support to have them make the needed changes.
Action Settings
Your actions have different settings based on the action type. Please check out the knowledge base article Page interactions to learn about all settings for each of those actions.
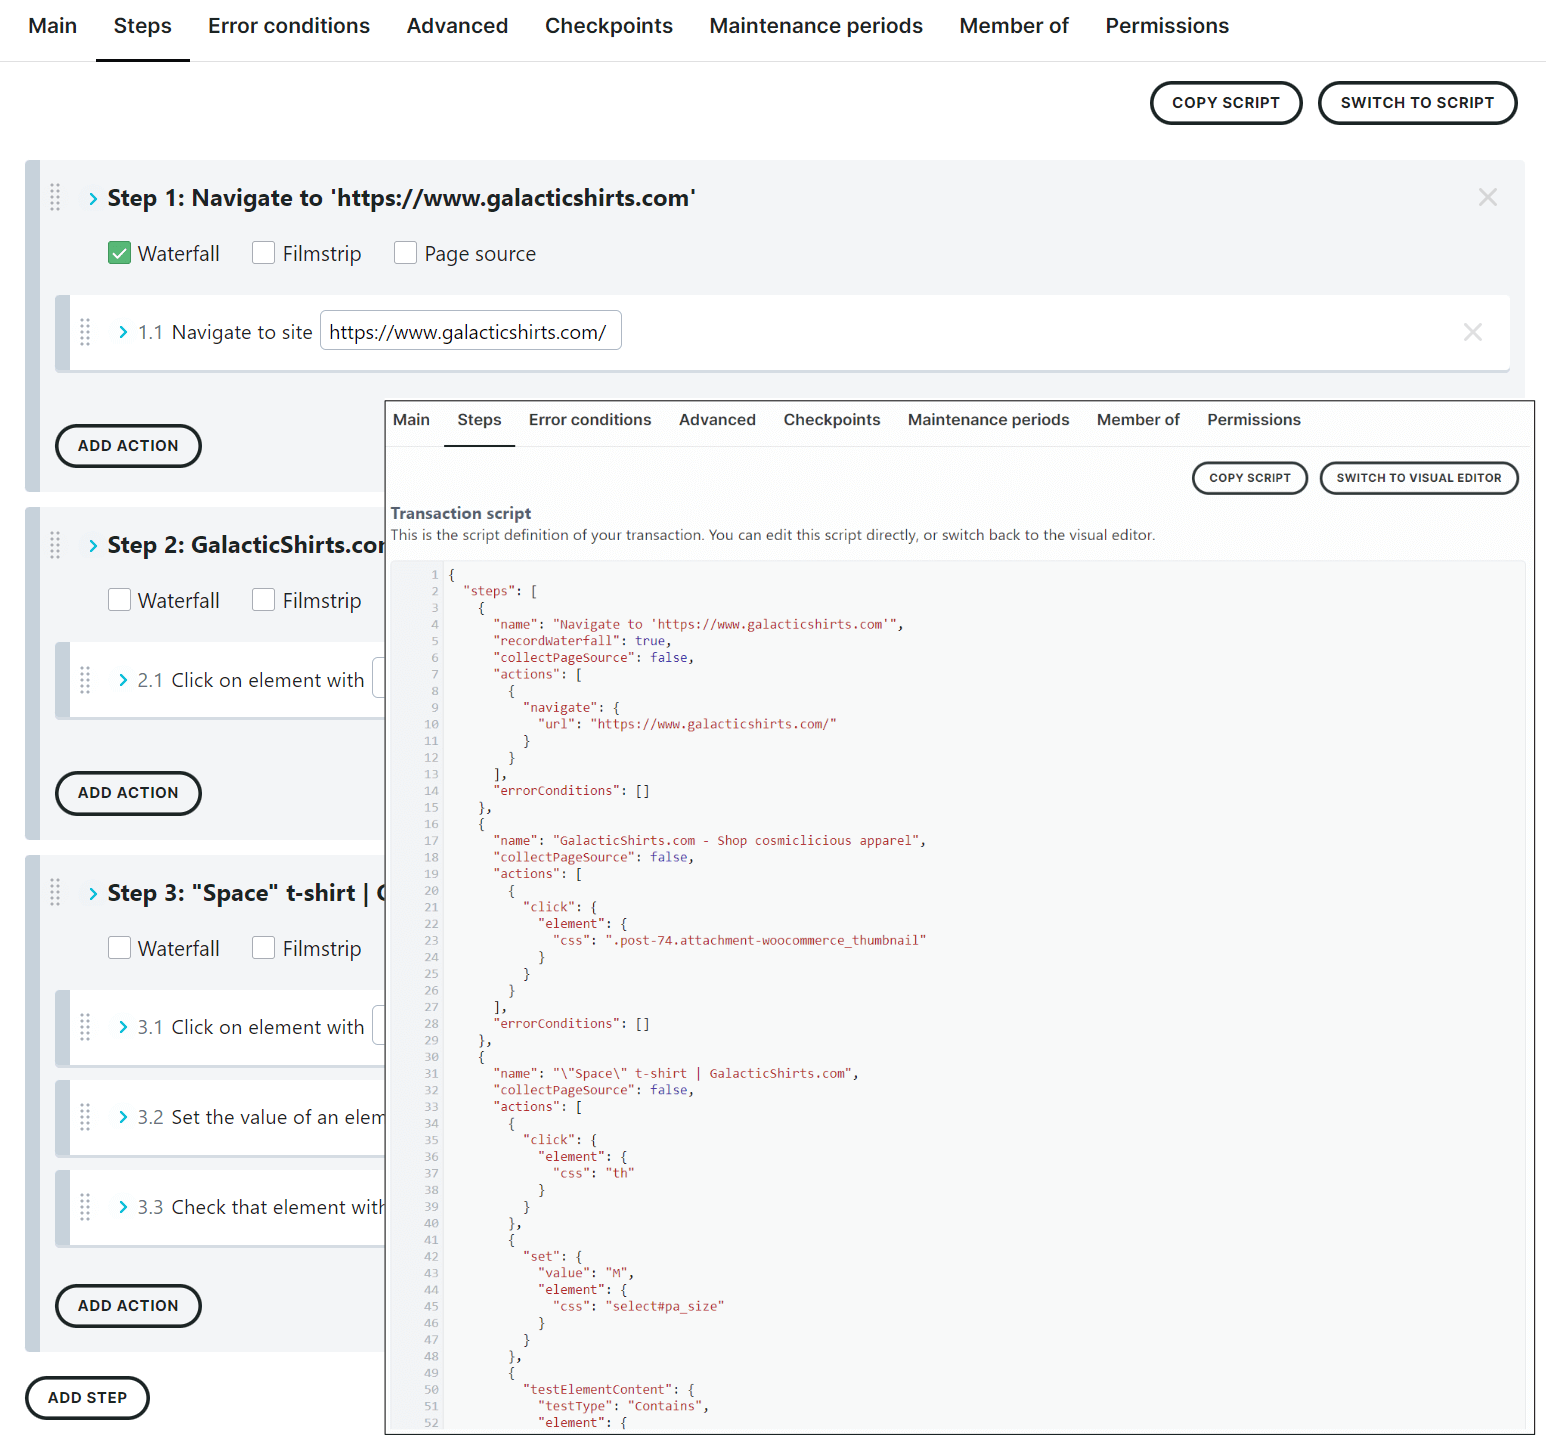
Scripting source code directly
You can always write your scripts in a different editor or environment and cut and paste the script (or write the script directly in our text editor). Use the Switch to script button at the top of the Steps tab to open the text editor. Once in the text editor, click the Switch to visual editor to get back. When switching between these modes, the script is validated.
Use the transaction API
You may wish to use the Uptrends' API to create monitors, upload scripts, alter scripts, and check your monitor’s status. To learn about all of the available methods, please see the API documentation.