
Like for transaction monitors , the Multi-step API monitor type comes with a script view editor as an alternative to the default visual editor. The script editor allows you to make changes to the steps of your monitor, much like the visual editor, but in a JSON script instead of the UI.
Advantages of the script editor
There are several advantages to using a script editor rather than making changes to the monitor through the UI:
- Power users may find making edits directly in a script easier than navigating through a UI. Some users prefer an experience similar to using a command line.
- Having a script available enables automation, for example to accomodate your CI/CD process . Using the Uptrends API , you can update the steps of the monitor at the same time as you’re updating the API it checks.
- The script editor allows you to make a local copy of the steps in your monitor, by simply copying the script and pasting it into a local file. Keeping a local copy allows for version control, backups of your multi-step API monitors, and easy replication of complicated setups.
Switching to the script editor
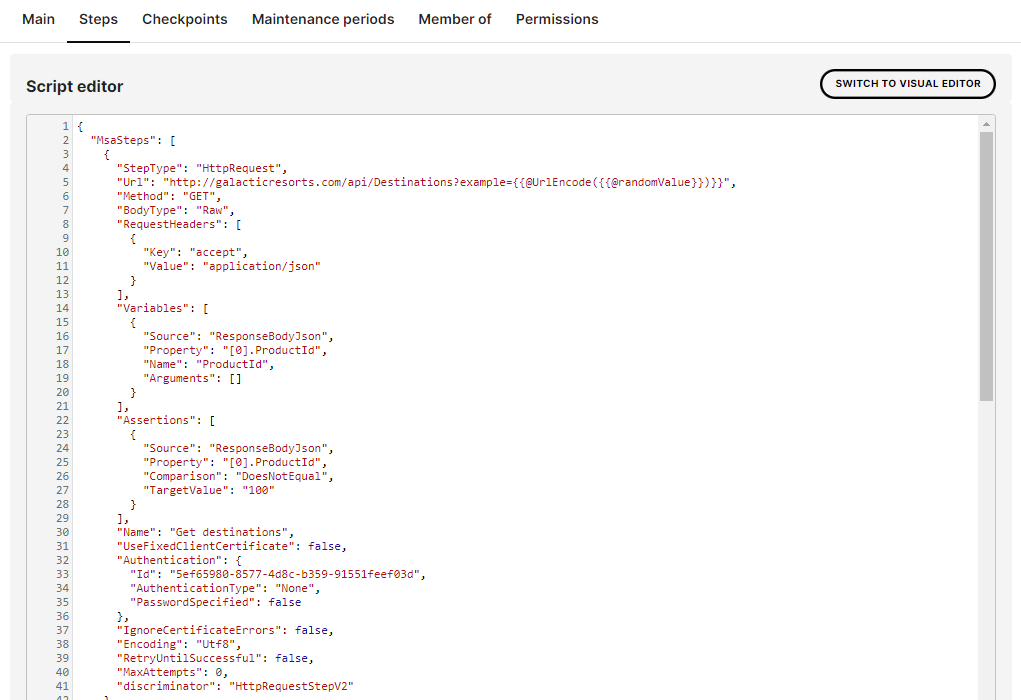
You can switch to the script editor for any Multi-step API monitor by navigating to the monitor options, going to the Steps tab, and clicking the SWITCH TO SCRIPT button in the top right. Switching to and from the script editor will trigger validation, so make sure that the JSON in the script view remains valid. The script will look as follows:
Understanding the script
As you can see, the script is essentially a JSON formatted array of individual steps, containing their request method, URL, any headers and request body you’ve configured, and the authentication options. Furthermore, each step entry contains the definitions for any variables created from or assertions on the response. Any necessary changes can be made directly in the script editor.
An individual step will look roughly like this:
{
      "StepType": "HttpRequest",
      "Url": "http://galacticresorts.com/api/Destinations",
      "Method": "GET",
      "BodyType": "Raw",
      "RequestHeaders": [
        {
          "Key": "accept",
          "Value": "application/json"
        }
      ],
      "Variables": [
        {
          "Source": "ResponseBodyJson",
          "Property": "[0].ProductId",
          "Name": "ProductId",
          "Arguments": []
        }
      ],
      "Assertions": [
        {
          "Source": "ResponseBodyJson",
          "Property": "[0].ProductId",
          "Comparison": "DoesNotEqual",
          "TargetValue": "100"
        }
      ],
      "Name": "Get destinations",
      "UseFixedClientCertificate": false,
      "Authentication": {
        "Id": "5ef65980-8577-4d8c-b359-91551feef03d",
        "AuthenticationType": "None",
        "PasswordSpecified": false
      },
      "IgnoreCertificateErrors": false,
      "Encoding": "Utf8",
      "RetryUntilSuccessful": false,
      "MaxAttempts": 0,
      "discriminator": "HttpRequestStepV2"
    }
Adding extra steps is as simple as adding extra entries into the array, using the complete step definition as outlined above.
After the array containing the steps, the step definition will also contain information about any predefined variables or user-defined functions you have set up:
"PredefinedVariables": [
    {
      "Key": "examplePredefinedVariable",
      "Value": "example value"
    }
  ],
  "UserDefinedFunctions": [
    {
      "Mapping": {
        "Error": "Red",
        "Ok": "Green"
      },
      "Name": "exampleMapping",
      "discriminator": "UserDefinedFunctionMapping"
    }
  ]