
Monitor groups are all about organization and making things easier. Once you have your monitor groups set up, they make applying templates, adding monitors to alert definitions, and configuring dashboards and reports faster and easier.
Deciding on monitor groups
Although your All Monitors group isn’t editable, any other group you make is editable, and a monitor can belong to multiple monitor groups. You can set up your monitor groups in several different ways. Here are some examples of common ways other users have set up their monitor groups.
Monitor type: It can be useful to set up monitor groups based on monitor type such as website performance monitors, mobile performance monitors, uptime monitors, API monitors, transaction monitors, and certificate monitors. This type of grouping is especially helpful when setting up reports.
Location specific: If you like getting your reporting based on geographic location, you might find it useful to set up your monitor groups by region or country. Typically these geographic specific monitors will share the same checkpoints making it easy to manage them using monitor templates.
Data Center: If you have sites supported by different data centers, you may want to set up groups based on the data center. You can quickly check for performance and uptime based on the data center. Grouping on the data center may come in helpful when setting up maintenance periods using monitor templates.
Importance: You may want to group monitors based on the importance of the monitor. For example, availability of your blog will not carry the same weight as your login page, so setting up monitor groups based on the importance of the URL is a great way to organize monitors and prioritize your reports.
Domain: You may maintain several domains or subdomains. Organizing based on domain makes it simple to escalate alerts accordingly.
Page purpose: There are also several users that group their monitors based on the URL’s purpose such as the login pages, homepages, and support pages.
Monitor groups overview
The Monitor groups page gives you an overview of the monitor groups in your account. Open it by going to .
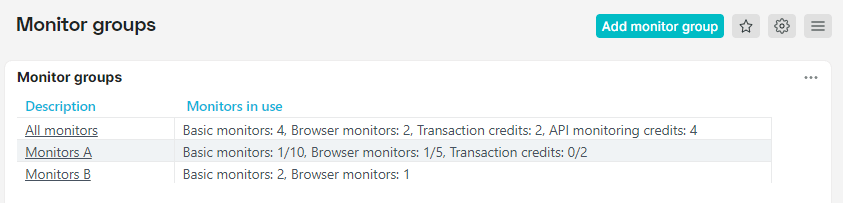
You will see all monitor groups where you have at least the View permission for. Learn more about this and other permission types for monitors and monitor groups.
The All monitors group is there by default in every Uptrends account. It contains every monitor in your account and you cannot change it or delete it. You may need a group similar to the All monitors group containing (nearly) all monitors but with the option to edit permissions and remove monitors from it. Look into setting up a default monitor group to achieve this.
The overview shows information about Monitors in use which refers to the maximum number of monitors (per type) set in your monitor groups. You can also choose to allow unlimited monitors - and set no limits per monitor type.
Examples
- If no limit is set and 4 basic monitors are used you’ll see “Basic monitors: 4”.
- If the limit is set to 10 basic monitors and 4 are used you’ll see “Basic monitors: 4/10”.
Creating a new monitor group
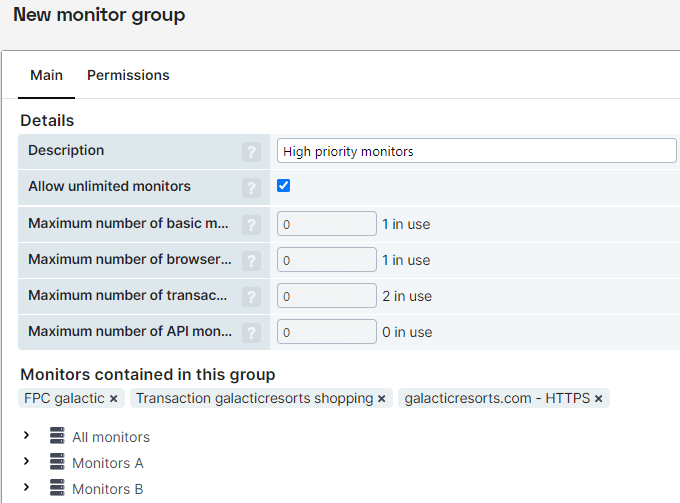
To create a new monitor group:
-
Go to .
-
Click the button at the top right. Alternatively, click the + sign in the menu .
The New monitor group page appears.
-
Fill in a descriptive name in the Description.
-
Decide whether you want to limit the number of monitors that may be added to this group. Choose Allow unlimited monitors if you don’t want to limit this. Remember that the total number of monitors in all groups can never be higher than the number of monitors in your account.
-
Add monitors that should be a member of this group: click on the existing monitor group in the Monitors contained in this group section to expand it, then select the monitor names. Note that you can also add a monitor to a monitor group from the monitor itself. Open the Member of tab to make those changes.
-
On the Permissions tab, add the operator (groups) with their corresponding access rights to this monitor group. The knowledge base article Monitor permissions has more info about the options here.
-
Click the at the bottom of the page.
Monitor groups play an important role when setting up a team and giving each member (operator) the necessary access rights. The article How to set up a team in your account contains detailed steps for this task.