
A Multi-step API monitor is made up of steps. For each step, you can configure both the HTTP request and response components. This article provides an overview on how requests work and how you can set up an HTTP request definition.
Request
Within a step, you will see the Request tab. You can define the API endpoint and set specific information when sending the request to the server.
Method and URL
As a minimum requirement, you need to specify the appropriate HTTP method and URL to start monitoring your API.
The available HTTP methods are:
GETHEADPOSTPUTPATCHDELETEOPTIONS
The URL is a fully qualified URL, including the schema (“https://” or “http://"), domain name, and path for your API. You can also use any query parameters to filter, sort, or customize the data returned by your request.
Some URL examples are:
https://galacticresorts.com/api/Destinationshttps://galacticresorts.com/api/Destinations?name=AlphaCygnusIX- You can also use a
Predefined variable to store a value from the URL and append it as
{{BaseUrl}}/api/Destinationsorhttps://galacticresorts.com/api/Destinations/{{ProductId}}.
Request headers
An HTTP request contains request headers, which are key-value pairs sent along with the request to provide additional information to the server. These headers define the parameters of the request, such as content type, authorization, and any special instructions for how the server should process the request.
When setting up a request step, you’ll notice that certain headers were added by default. You have the options to add a new request header, override a default header, or use vault items.
The image above shows an example of a GET request step to https://www.galacticresorts.com/api/Destinations. By default, the request includes headers such as Host, Accept-Encoding, and Content-Length. The values for the Host and Content-Length headers will be determined upon sending the request. Additionally, the Accept header has been set to application/json, and the default Accept-Encoding header has been overridden.
You can also add other headers like Content-Type. The most common content types are application/json for JSON data, text/xml for XML data, and application/x-www-form-urlencoded for webform data. Similarly, if your API requires authentication, include an Authorization header along with the appropriate data in the Value field.
Add new headers
To add a new header:
- Click Add request header.
- Specify the header name. For example,
Content-Type. - Specify the header value. For example,
application/json.
Override a default header
To override a default header:
- Click Add request header.
- Provide an existing header name. For example,
Accept-Encoding. - Provide a new header value. For example
gzip, compress. The default header now appears crossed out, showing that it has been overridden.
Request body
When specifying a POST, PUT, PATCH, HEAD, OPTIONS, or DELETE request, the Request body contains the specific content or payload as part of the request definition.
There are different request body formats you can choose from when sending data as part of the request:
- Raw text — lets you send plain texts without any formatting applied.
- Upload a file (as form-data) — lets you send a file, such as images and documents from the Vault in form-data format.
- Upload a file (as binary) — lets you send a file, such as images and documents from the Vault in a raw binary data format.
- Multi-part form — lets you send multiple types of content in different formats. For example, sending plain text entries and files retrieved from the Vault simultaneously.
To use vault items in the request body, refer to Use vault items as file uploads.
Authentication
If your API is protected and requires authentication upon server request, you can select from the available authentication options below:
- Basic authentication — lets you specify a username and password, which are encoded in a Base64 format and sent to the API server.
- NTLM (Windows) authentication — lets you specify a username and password to authenticate with Windows servers or domains.
- Digest authentication — lets you specify a username and password, which are MD5 hashed and sent to the API server.
- Set up OAuth based authentication — lets you use a custom authentication, specifically, OAuth 2.0.
If you want to use your existing vault items to set up authentication for your request, refer to Use vault items section below. For more information, refer to Multi-step monitoring Authentication.
Client certificates
If your API requires clients to identify themselves using a client certificate, use one of these options:
- Uptrends client certificate — uses an Uptrends certificate, which will be included when the HTTP request is sent.
- Custom client certificate — lets you add your own client certificate, stored in the Vault, which will be included when the HTTP request is sent.
For more information, refer to Multi-step API - Client certificates.
HTTP and TLS versions
To have a better control of your API calls, you can specify the HTTP and TLS versions for additional restrictions. For more information, refer to the HTTP and TLS versions knowledge base article.
HTTPS connection
Whenever an API call is made, your server automatically verifies the TLS or SSL certificate by default. If you want to bypass any certificate validation and ignore any related errors, simply select this option.
Error handling
In the Request tab, selecting Error handling allows you to ignore the errors that occurred within a step. If a monitor encounters any form of errors within the step, the monitor will simply skip the step. It then continues to execute the remaining steps until all have been completed. For more information, refer to the Error handling knowledge base article.
Use vault items
The Vault is a centralized storage that helps you store and manage credentials and other sensitive information to use them across your monitor setup.
Let’s say you want to authenticate using a specific username or password when making a request to the server, simply use a vault item like a vault credential set as part of the request body and request headers. Alternatively, you can also use the Authentication field as mentioned previously.
To use a vault credential set, use the following syntax, depending on which value is required:
- Username:
{{@VaultItem.<itemGuid>.Username}} - Password:
{{@VaultItem.<itemGuid>.Password}}
You can find the <itemGuid> when you navigate to the menu and select a specific vault item. From the URL, copy the value after the VaultItemGuid=. For example, 91303546-79e1-4f62-9b62-8973323dfe3b in https://app.uptrends.com/report/VaultItem?VaultItemGuid=91303546-79e1-4f62-9b62-8973323dfe3b.
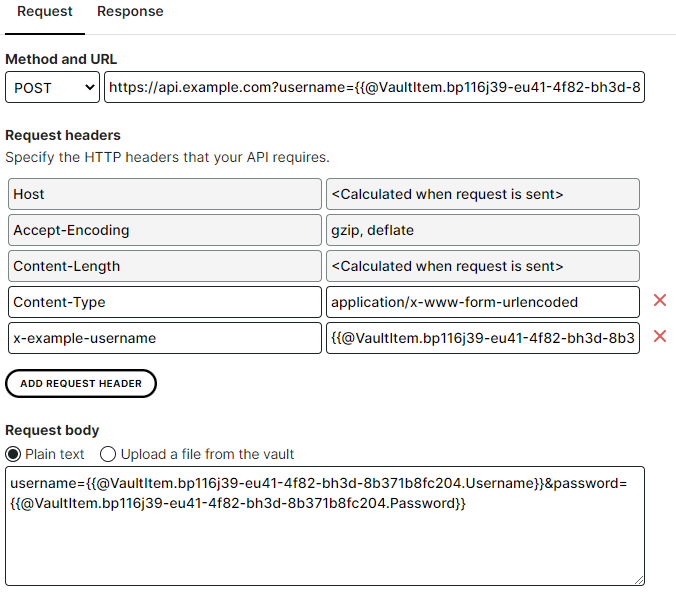
As shown in the image, the username and password were retrieved as a vault credential set. Both were used in the URL, request header, and request body definitions.
Use vault items as file uploads
Multi-step API monitors allow you to upload files from the Vault as part of the request definition.
To upload a file from the vault, follow these steps:
- In the Request > Request body, select any of the following options:
- Upload a file (as form-data)
- Upload a file (as binary)
- Multi-part form
- Click Add file from vault.
- Choose the appropriate file stored from the Vault.
- Click to add the file.
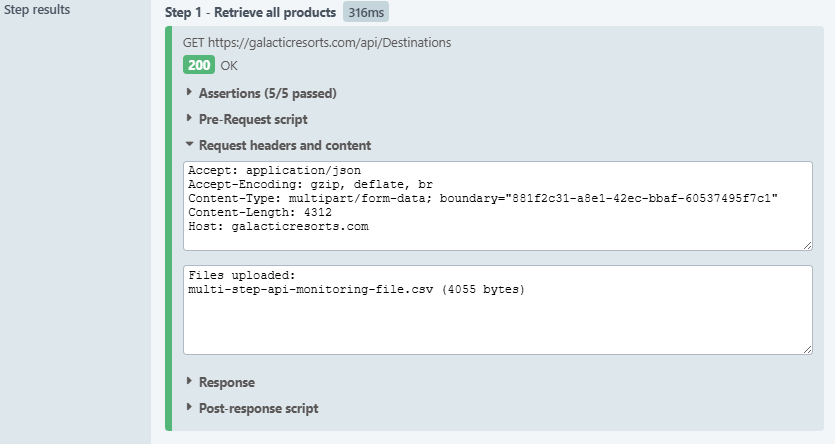
The file has been added. You don’t need to specify any request headers since some headers like Content-Type: multipart/form-data were automatically added and set with the correct value.
You can verify if the file upload was successful by running a test in the monitor. You’ll see the results in the Request headers and content:
Custom scripting
Both the request and response parts of a step can optionally be extended using Custom scripting in the Pre-Request and Post-Response tabs. This lets you execute scripts written in JavaScript language to perform custom logic and do in-depth functional tests. Aside from the full range of capabilities the standard JavaScript offers, you can also use Snippets, which are Uptrends pre-defined scripts to verify the correct functionality and behavior of your APIs.