
To get started with variables, we recommend reading the Multi-step API Response article for an overview of its core functions and key features.
This article explains the different types of variables that you can use to capture and store values from the API response.
Variables
In a multi-step API setup, variables are used to extract values from HTTP responses and temporarily store them for later use.
Consider a scenario where you have a Product ID or API key that must be used throughout your API scenario. You might also have other values, such as a domain for each API, that you want to define once and reuse across multiple steps. In this case, you can create a variable called BaseUrl with the value https://test.yourapi.com. Then, reference this variable in your API URLs, for example, {{BaseUrl}}/UserService/GetUserInfo or {{BaseUrl}}/UserService/GetProductInfo. By defining this variable, you can easily switch between environments, such as staging and production, by updating the variable instead of modifying each step individually.
In scenarios like these, variables allow you to:
- Extract information from one HTTP response and use that specific value to construct the next HTTP request.
- Define a value once and reuse it across multiple steps throughout the entire API scenario.
- Update a variable’s value in one place and have the change automatically reflected in subsequent steps.
All variables defined in a step are evaluated after the HTTP request is executed and the response is processed.At that point, if a variable already existed either through a previous step or because you predefined it, its existing value will be overwritten.
Otherwise, a new variable will be created and added to the list of variables. This list of variables and its corresponding values will then be carried across to the next step. Variables can be created and reused as often as needed.
Defining variables
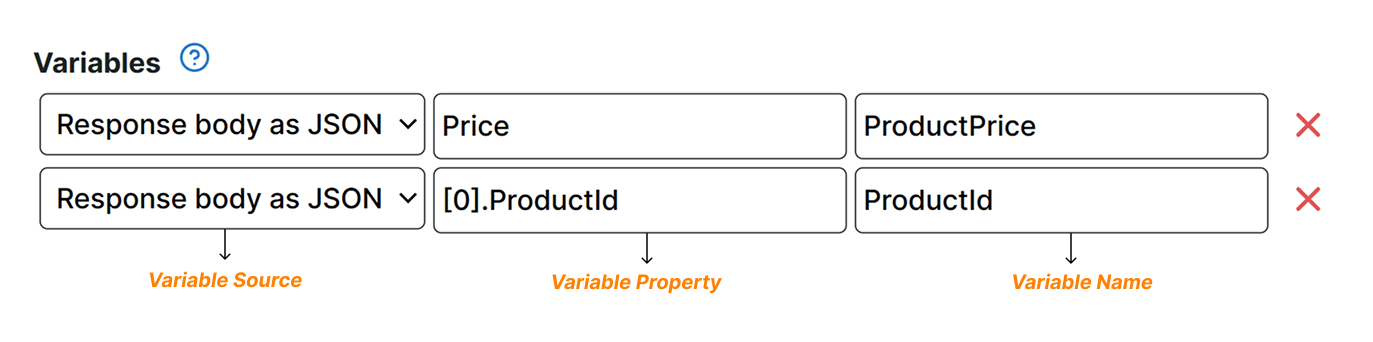
In the example below, two variables are defined to store the product price and product ID from the response. Similar to the pattern used to define
assertions, variables are defined using three fields:
source property variable name. Each field corresponds to a specific value, showing how the API values are stored and how the variable is created.
Below are the variable fields that you can define based on your monitoring requirements.
Variable source
This field defines the origin or the data source that you want to check. This could be from a Response body as JSON, Response body as text, or an attribute from an HTTP response, such as Status code, and many more. For more information, refer to
Sources.
Variable property
Some
Source options like Response body as JSON and Response header require you to specify a particular content check to further validate the response. If you want to check a specific data from the response, you need to provide the exact property value appropriate for the source type. In the example above, the [0].ProductId is the property value.
For more information, refer to Property.
Variable name
This field is the identifier used to reference the variable in each step. To use variables, use the syntax: {{VariableName}}.
If a problem occurs during variable evaluation, such as attempting to extract a value that is not present in the response content, the step fails and an error is reported.
Types of variables
There are multiple types of variables that you can create depending on your use case.
Predefined variables
Below the step editor, you’ll find an additional section where you can specify predefined variables. These variables are available right at the beginning of the entire API scenario. If you need to use a particular value several times, you can define that value in advance and use it in different steps.
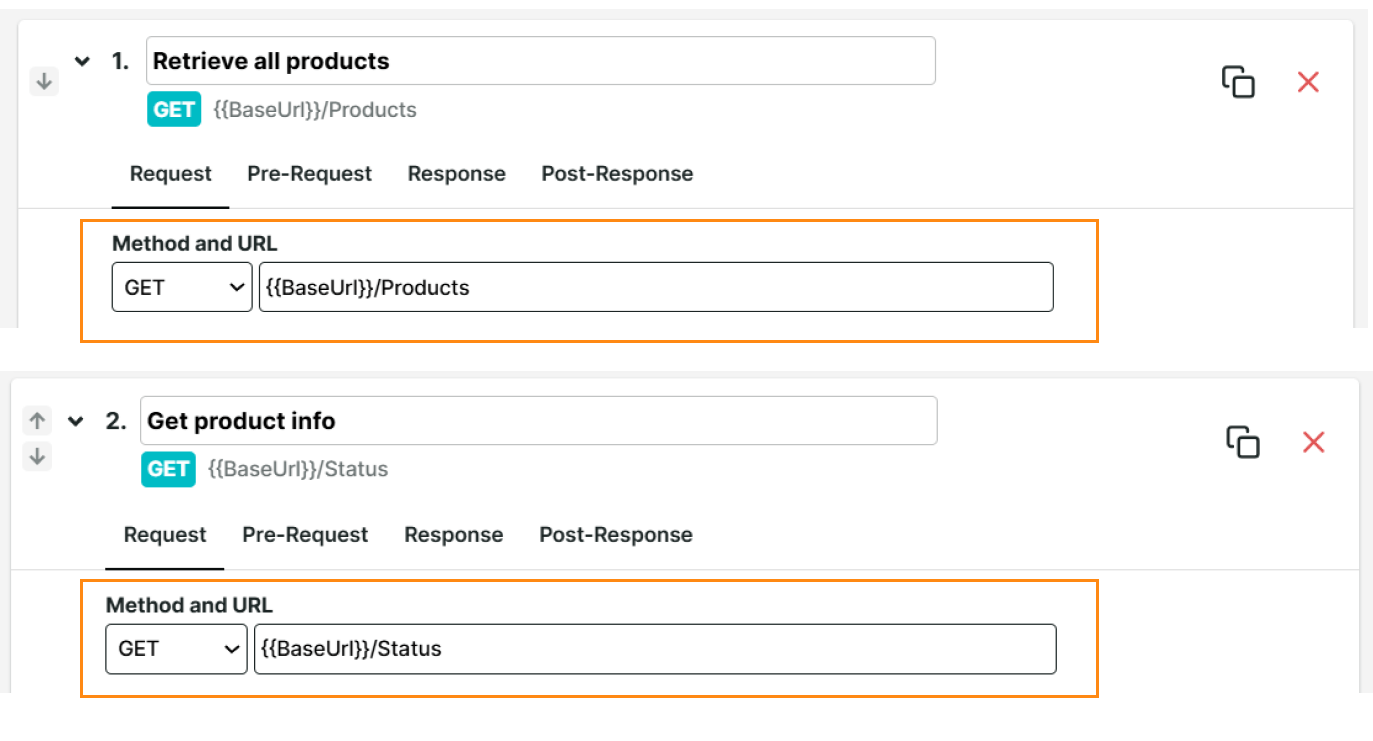
As shown in the image, you can use the {{BaseUrl}} variable to target different endpoints for each step, such as {{BaseUrl}}/Products and {{BaseUrl}}/Status. For more information, refer to the
Multi-step API Pre-defined variables article.
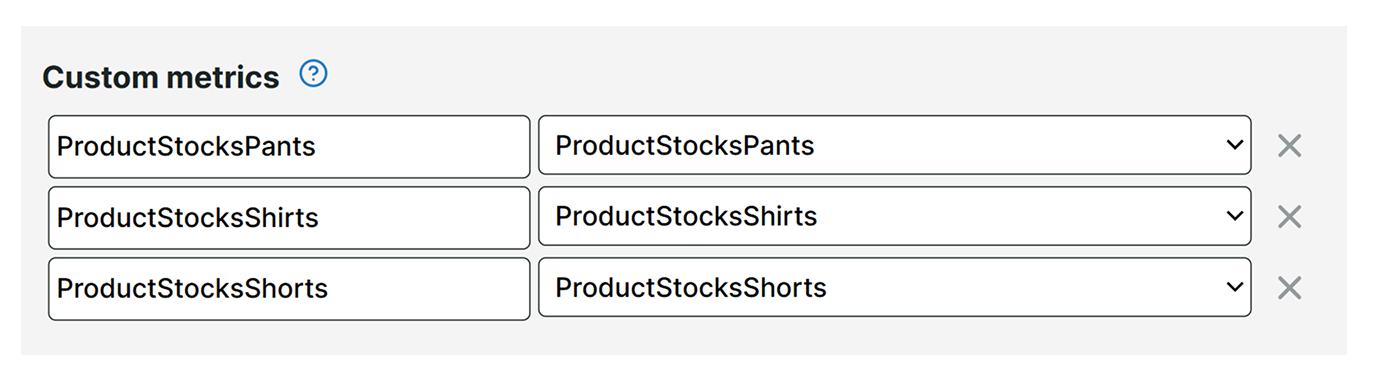
Custom metric variables
When your multi-step API monitor captures data from your APIs, you may want to track numerical values that aren’t part of the standard metrics. You may want to use custom values beyond the response status code, response duration, and others, to better evaluate your API’s behavior.
Custom metric variables allow you to create a user-defined variable to store any numerical data captured from the API’s response. This is helpful when you want to keep track of your product stocks, sales, and others.
For more information, refer to the Custom metrics article.
Automatic variables
Aside from the variables you define in your monitor setup, you also have access to a number of automatic variables that we’ve created for you. These variables are already set to generate values that you can use in your HTTP requests and during the evaluation of your HTTP responses using assertions. Some examples of automatic variables are {{@DateTime(format,offset)}} and {{@RedirectUrl}}.
For more information, refer to the Automatic variables article.
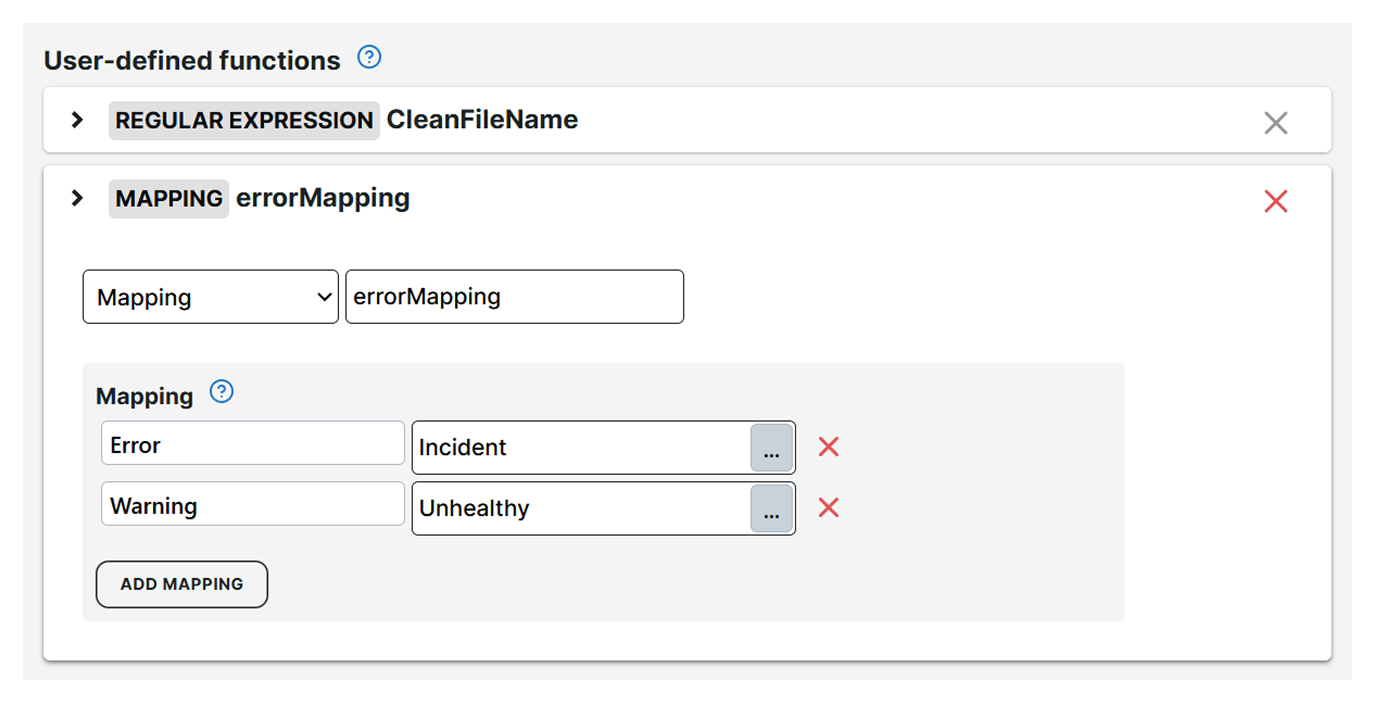
User-defined functions
In some situations, values extracted from the API response need to be transformed or mapped to a particular format before they can be used.This is helpful when you want to extract values from an array of strings or you want to use a regular expression to get the file name from an entire path. Uptrends allows you to set user-defined functions, which can convert variable values either from a previous step or a system variable to a new value.
For more information, refer to User-defined functions.
Using variables in other steps
Once a variable has been retrieved and evaluated successfully, its value can be re-used in the request definition of subsequent steps and inside assertions. You can reference a variable by enclosing the variable name in double curly braces: {{variable-name}}.
The following examples show how you can reference a variable in different use cases:
-
In the URL of a step:
https://myapi.customer.com/ProductInfo/{{ProductId}} -
In a Request header:
"Authorization": Bearer {{access_token}} -
In a Request Body content:
{ "ProductId": "{{ProductId}}", "Code": "P123456" } -
In the
target valueof an assertion. If you have a variable,{{ProductId}}, populated in a previous step or as a predefined variable, you can use this to compare the response and variable value:Response body as JSONProducts[0].Id"/Name/text()Equals{{ProductId}} -
In the
propertyvalue of an assertion. If you have a variable,{{ProductId}}, you can refer to that variable in a JSON expression or XPath query to select the content you’re looking to verify:Response body as XML//Product[@Id="{{ProductId}}"]/Name/text()EqualsChocolate chip cookie
Encoding of variable values
Depending on where you use your variables, it’s sometimes necessary to encode their values. Encoding means converting special characters into a format that is suitable for HTTP requests. Usually, variables that are used in a URL need to be encoded.
Imagine you’re building a URL that takes a name parameter and you want to use a variable called CompanyName to specify a value for that parameter. Without considering encoding, you would use it like this:
https://my.api.com/GetCompanyInfo?name={{CompanyName}}
Let’s say that the CompanyName variable contains the value Ben & Jerry's. That value contains spaces and an ampersand character, which have a special meaning in a URL. Without applying any encoding, you wouldn’t get the correct value across to the server.
If you apply encoding first, the value will be converted to Ben\+%26\+Jerry's, which will be interpreted by the server as the original value. To encode a variable, use the {{@UrlEncode(...)}} function and include the full variable name inside the parentheses.
In this case, it should look like this:
https://my.api.com/GetCompanyInfo?name={{@UrlEncode({{CompanyName}})}}
If a variable contains only numeric values and no special characters, you don’t need to use the @UrlEncode function. We will automatically URL-encode variables used in the Request body field of a step as long as the Content-Type header is set to application/x-www-form-urlencoded. Other content types don’t usually require URL encoding.