One of the primary things that set transaction monitoring apart from our other monitoring types is the ability to interact with pages. Using Web Application Monitoring, Uptrends clicks page elements, completes forms, inputs login credentials, uploads files, and otherwise performs all sorts of user actions to test your user journeys.
With Self-Service Transactions, you create a script that interacts with your page through a group of four available action types or interactions. The four main page interactions that will be discussed in this article are Navigate, Click, Hover and Set. The Set-interaction also allows for File uploading. Other actions also exist, including such things as content checks, taking a screenshot or creating a waterfall report.
Navigate
Navigation is the very first action recorded or added to any transaction script. Every transaction starts by navigating to a URL before it begins to test your site’s functionality. The navigation action tells the browser to go to the URL, and the monitor waits for the page to load completely (within a reasonable time frame).
In most cases, a transaction only contains the one navigate action at the start. However, sometimes a second navigation is needed within the transaction. When additional navigation steps are needed, we recommend you put these navigate actions in their own respective steps. Putting navigation actions in their own step helps you to keep oversight of what’s happening at which point in your transaction, and helps you make sense of the timing metrics Uptrends measures per step.
It should be noted that a navigate action will always use one transaction credit.
Navigate options
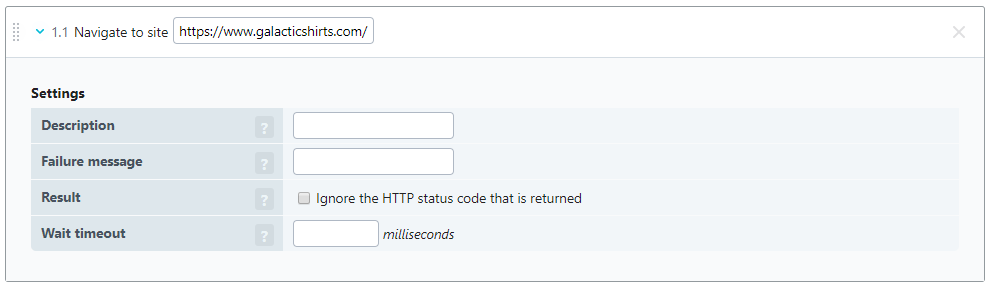
The available options for the navigate action include (see figure below):
- URL: the URL used for the navigation (required).
- Description: a description of the action, used for reporting purposes.
- Failure message: The message that will be included in error reports, in the event of an error.
- Result: checkbox instructing Uptrends to Ignore the HTTP status code returned.
- Wait timeout: a value indicating how long Uptrends should wait for the page load to complete. The default (and maximum) value is 60 seconds.
The Result setting is different from all of the other action types. By default, a navigate action ensures the page has loaded correctly, and that the monitor received a non-error HTTP status code (any status code less than 400). Any status code 400 or higher generates an error for the navigation action, and the transaction stops executing. If you need the transaction to proceed despite receiving an error status code, enabling Ignore the HTTP Status code that is returned tells Uptrends to continue regardless of the resulting status code.
Follow Navigate actions with content checks
To ensure that the transaction ends up on the correct page after the navigation action, add a content check as the next action. A content check gives you the certainty that your transaction landed on the correct page, and that the page fully loaded and the page displays the components that allow the monitor to interact with the page further before executing the next action.
Use waterfall reports with Navigate actions
Since a navigate action loads a completely new page, you may find it useful to gather specific metrics about the page load times by enabling the waterfall report option in the step that contains the navigate action. Each waterfall report added to a transaction uses one transaction credit .
Click
The Click action tells the browser to click a specific page element using a CSS or XPath selector. There are a variety of potential uses for a click action:
- Selecting options,
- Opening sub-menus,
- Selecting checkboxes, or
- Clicking links that take the transaction to the next page.
Therefore, the Click action is an integral part of any transaction.
Broadly speaking, a click action falls into two categories:
- Either Click actions lead to a new page (links or buttons), or
- Click actions perform an action on the existing page.
A click may or may not result in the use of a transaction credit .
Click action options
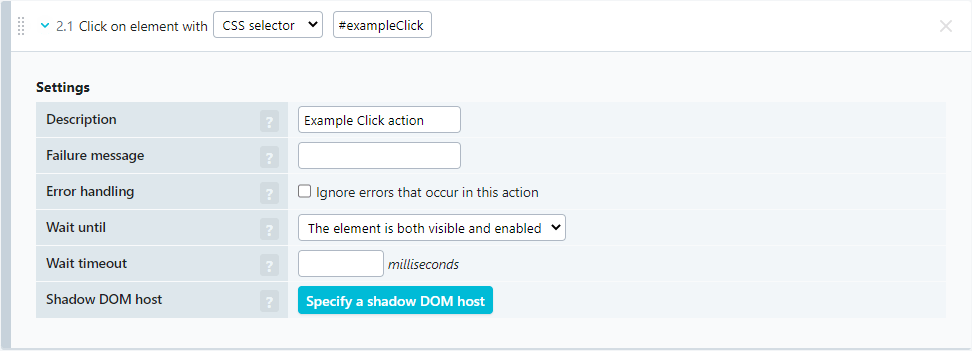
The Click action options include (see figure below):
- Description: a description of the action, used for reporting purposes.
- Failure message: The message that will be included in error reports, in the event of an error.
- Error handling: Selecting the Ignore errors that occur in this action checkbox tells the monitor to disregard any errors that this action may encounter such as not finding the clickable element.
- Wait until: Before a click action can happen, the element the monitor needs to click needs to be rendered and visible on the page (speaking in CSS terms, the element must be displayed and visible). These wait conditions have their own dedicated knowledge base article , in which you can find information about the different options.
- Wait timeout: You can specify the amount of time the monitor should wait for the element to meet the Wait until requirement above. The default wait time is 30 seconds, but you can override the default for a maximum wait time of 60 seconds.
- Shadow DOM host: If the element that must be interacted with exists in a shadow DOM, the transaction needs to be configured to look for the element inside of that shadow DOM. You can learn more in our knowledge base article on working with a shadow DOM in your transaction.
Set
The Set action tells the monitor to input values for elements. There are several scenarios for a set action:
- Completing text fields and boxes: Credentials and other strings of characters commonly needed in input fields.
If the Set action triggers an autocomplete function; for example, when you enter a zip code or search term, the page might suggest a full address or commonly searched terms. In auto-complete cases, you may want to add a content check to make sure that the auto-complete function worked correctly and add a click action to select the desired option. - Selecting options from a drop-down: Typically, select element types have several predefined elements each with their own values. Using a CSS or XPath selector, point the script at the select element. You can choose to set the option element’s id attribute, value attribute, or text content.
- Uploading files from the vault: In certain cases, a file upload may be required to correctly test your flow. For example, if you’re filling out a complaint form that requires a mandatory screenshot, or if you’re testing the uploading capability of an online repository. It’s possible to have the transaction upload a file from your account vault. You can find a guide on how to set up file uploads further down this page.
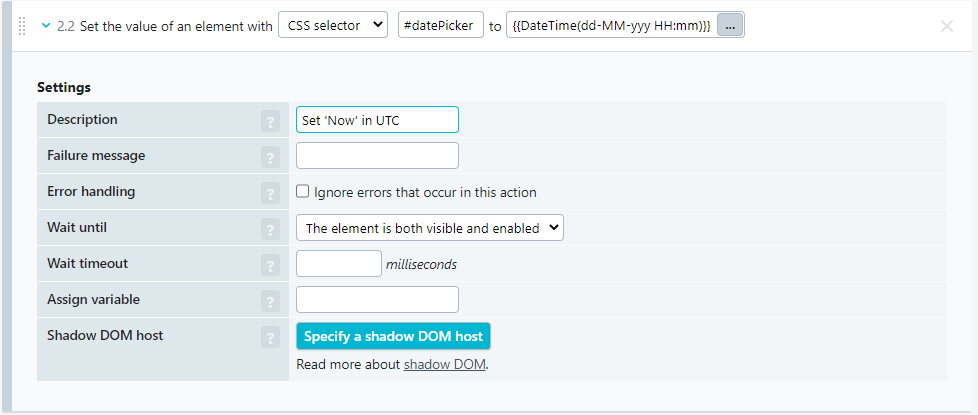
When you add a Set action to a step it will look like this:
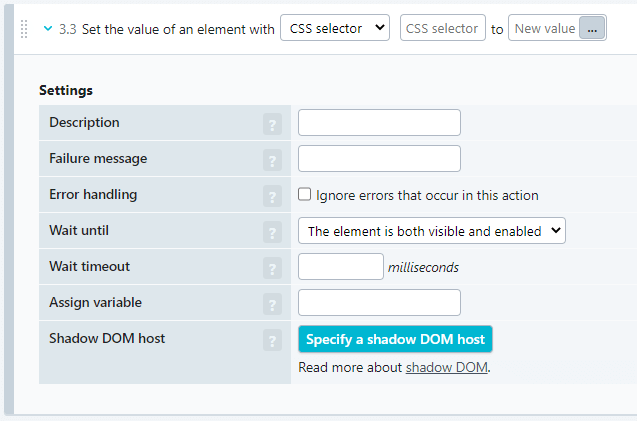
The Settings are explained in Set action options.
First you have to define which element you want to set and to which value. Enter the CSS selector or XPath query for the element that you want to enter a value (or file upload) for.
Then click the ellipsis button to open the Select a value pop-up dialog.
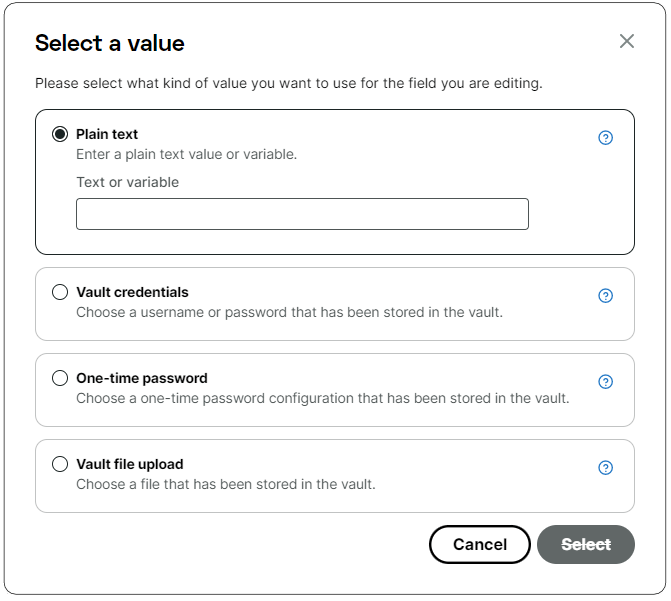
The options are plain text or variables, vault credentials, one-time password, and vault file upload.
Plain text or variables
You can use simple text or variables or a combination of both to fill in the value of an element. There are two kinds of variables: automatic variables and user-defined variables.
Automatic variables
You can use the Set action for filling in dynamically generated data, such as timestamps or random strings selected from an array. These automatic variables should be entered as follows: {{@variableGoesHere(option1,option2)}}
If you wish you use any automatic variables in your transaction, please refer to the complete list of available automatic variables .
User-defined variables
For more information on user-defined variables, please see our article on using transaction variables.
File uploading in transactions
To configure your transaction to upload files, you must first add the file(s) to the vault. For instructions on how to add files to your vault, see our article on the vault .
When you’ve added the file to your vault, you’re ready to configure your transaction with the file upload. Uploading files makes use of the Set action. You’ll need to add this action to your transaction, and then configure it to upload the file:
-
Navigate to the correct transaction step editor by going to the monitor options, and then the Steps tab.
-
Add a Set action in the step where you require the file to be uploaded.
-
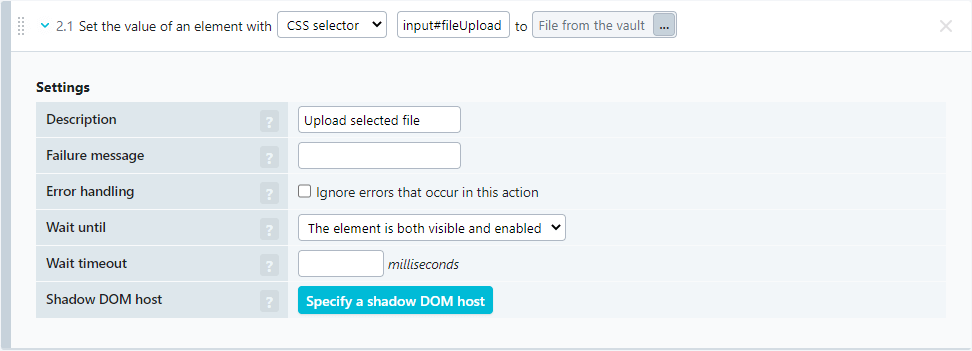
Set the correct CSS or XPath selector to select the file upload element.
Note: Most often, the correct file upload element to interact with on the page is aninput type="file"element. In some cases, these elements can be ‘hidden’ on the page, where the user clicks on a button or link instead. The Set action should take place on the actual file upload element on the page. Since such elements are not always visible, it is generally a good idea to set the Wait until option in the Set-action from its default value of The element is both visible and enabled to The element exists. -
Click the ellipsis button next to New value to open the dialog that allows you to specify the element value.
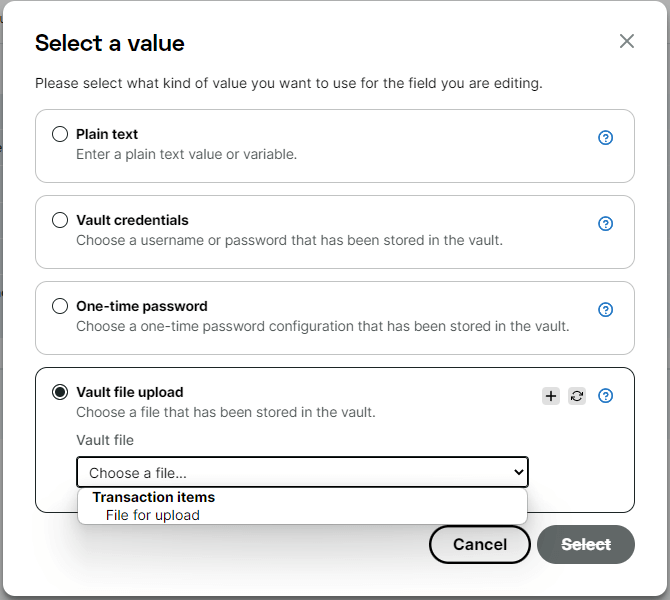
-
Click Vault file upload, and select the correct file. If you have more than one file in your vault, they should be listed by vault section.
That sets up the transaction to include a file upload. From here, you can continue building the transaction as you normally would.
Set action options
You have several options available to you for the Set action.
- Description — a description of the action, used for reporting purposes.
- Failure message — The message that will be included in error reports, in the event of an error.
- Error handling — Selecting the Ignore errors that occur in this action checkbox tells the monitor to disregard any errors that this action may encounter such as not finding the clickable element.
- Wait until — Before a click action can happen, the element the monitor needs to click needs to be rendered and visible on the page (speaking in CSS terms, the element must be displayed and visible). These wait conditions have their own dedicated knowledge base article , in which you can find information about the different options.
- Wait timeout — You can specify the amount of time the monitor should wait for the element to meet the Wait until requirement above. The default wait time is 30 seconds, but you can override the default for a maximum wait time of 60 seconds.
- Assign variable — Enter a variable name in the format
{{name}}. This variable holds the value that was set within this action. You can use this variable then in a later step or action. - Shadow DOM host — If the element that must be interacted with exists in a shadow DOM, the transaction needs to be configured to look for the element inside of that shadow DOM. You can learn more in our knowledge base article on working with a shadow DOM in your transaction.
Hover
When a page contains elements that require the user to hover the cursor over them to perform an action such as selecting a sub-menu or selecting from a drop-down, you need to add a Hover action. Before the user or monitor can interact with an underlying element such as links in a drop-down/pull-down menu, the element needs to be visible on the page.
Because the cursor is always on the page during the transaction recording, the recorder would constantly record hover events that you would need to remove after the fact. Instead of removing possibly hundreds of unneeded hover events, the recorder doesn’t record any hover actions. Therefore, you need to add any required hover actions after the fact.
In the example below, to access the menu for the selection of the checkout option, you must first hover over the shopping cart.
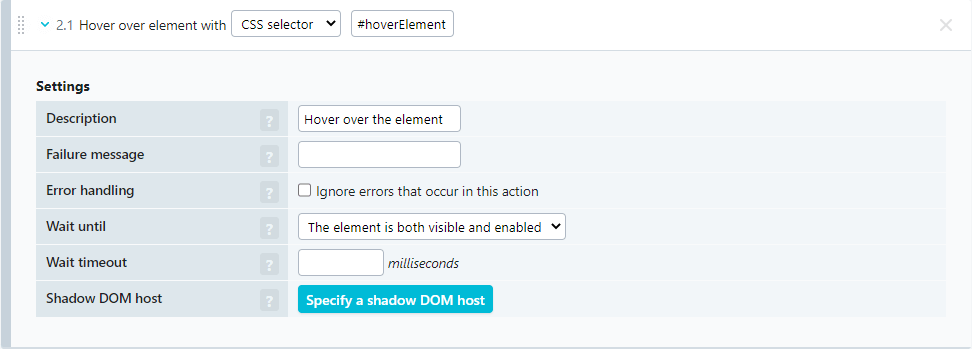
Hover action options
You have the following option settings for the Hover action (see figure below):
- Description: a description of the action, used for reporting purposes.
- Failure message: The message that will be included in error reports, in the event of an error.
- Error handling: Selecting the Ignore errors that occur in this action checkbox tells the monitor to disregard any errors that this action may encounter such as not finding the clickable element.
- Wait until: Before a click action can happen, the browser has to render the element making it visible on the page. These wait conditions have their own dedicated knowledge base article , in which you can find information about the different options.
- Wait timeout: You can specify the amount of time the monitor should wait for the element to meet the Wait until requirement above. The default wait time is 30 seconds, but you can override the default for a maximum wait time of 60 seconds.
- Shadow DOM host: If the element that must be interacted with exists in a shadow DOM, the transaction needs to be configured to look for the element inside of that shadow DOM. You can learn more in our knowledge base article on working with a shadow DOM in your transaction.
Use content checks after hover actions
To check for a successful Hover action (the sub-menu loaded correctly), consider adding a content check action directly after the hover to verify that the monitor can interact with the menu before proceeding.
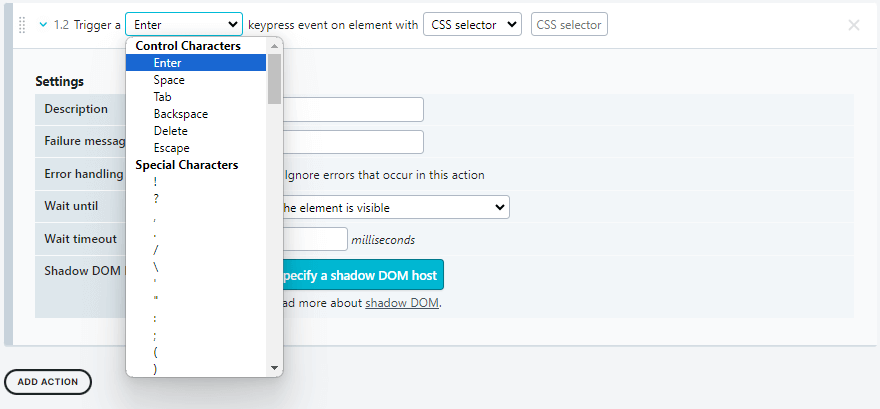
Key event
The Key event action allows you to add a single key press to a transaction step. This action can be handy when there is an element on your webpage that has no clickable element (button), e.g. to submit a search term when there is no button present to submit the search.
In a transaction step, add a new action and choose the Key event action from the list of page interactions. In the new action, you have to choose a character from the list of available characters. Please enter a CSS selector or XPath to identify the element you want to enter the key in.
Key event action options
The following settings are available for the Key event action in a step:
- Description — a description of the action, used for reporting purposes.
- Failure message — The message that will be included in error reports, in the event of an error.
- Error handling — Selecting the Ignore errors that occur in this action checkbox tells the monitor to disregard any errors that this action may encounter such as not finding the clickable element.
- Wait until — Before an action can happen, the element the monitor should interact with needs to be rendered and visible on the page (speaking in CSS terms, the element must be displayed and visible). These wait conditions have their own dedicated knowledge base article , in which you can find information about the different options.
- Wait timeout — You can specify the amount of time the monitor should wait for the element to meet the Wait until requirement above. The default wait time is 30 seconds, but you can override the default for a maximum wait time of 60 seconds.
- Shadow DOM host — If the element that must be interacted with exists in a shadow DOM, the transaction needs to be configured to look for the element inside of that shadow DOM. You can learn more in our knowledge base article on working with a shadow DOM in your transaction.