
In this article, we’ll go over the steps for handling a shadow DOM on your page, when configuring a transaction monitor.
Document Object Model (DOM)
A DOM (Document Object Model) is a representation of each of the elements in a markup document (such as an HTML document for web pages). When you load a web page, your browser constructs a DOM based on the HTML document, arranging each individual element in a tree-like structure. You can view the DOM for any given page by opening your browser’s Developer tools (usually by pressing F12), in the ‘Elements’-tab.
The DOM is used as a live representation of the document (changes to the DOM equals changes on the web page as displayed in the browser), so that temporary modifications can be made to the page while it’s being displayed in the browser window, using JavaScript for example.
Shadow DOM
Things like JavaScript and CSS apply globally to each node within the DOM. In some cases, however, that can lead to issues. For example, if your page features web components (reusable elements, like tables or payment modules that may feature on several pages), there may be conflicts in markup or styling with the rest of the page. To avoid this, it’s good practice to encapsulate these web components: ensure that they can exist separately from the main document, to avoid conflicts and simplify the code.
One option for achieving this exists in the form of shadow DOMs. A shadow DOM enables a separate, hidden DOM tree to be attached to specific elements in the regular DOM tree. A shadow DOM is structured the same way as a regular DOM, but is attached to a shadow host: a node within the regular DOM. Since a shadow DOM is a separate ‘tree within a tree’, none of the code inside it can affect any of the nodes in the regular DOM, and vice versa.
Configuring shadow DOM for transactions
The interactions within a transaction script act upon the nodes in the page DOM. Since a shadow DOM is separate, a transaction monitor must be configured to look inside that shadow DOM rather than the main document DOM. Let’s look at an example, and say your web page’s DOM contains the following:
<html>
    <head>...</head>
    <body>
        ...
        <example-root-element id="exampleId" class="class example">
            #shadow-root (open)
                <a class="linkClass" href="https://www.exampledomain.com">Example link</a>
                <div>Some example text</div>
                <input type="text" id="exampleTextfield">
        </example-root-element>
        ...
    </body>
</html>
This section of a DOM contains a shadow DOM, indicated by the #shadow-root (open) node. The shadow DOM contains three elements: a link (with class ‘linkClass’), a string of text (the <div> containing “Some example text”) and a text field <input> element (with ID ‘exampleTextfield’).
As is always the case with a shadow DOM, it is attached to an element in the main document DOM. In this case, that element (known as the shadow host) is <example-root-element> which has its own ID and class.
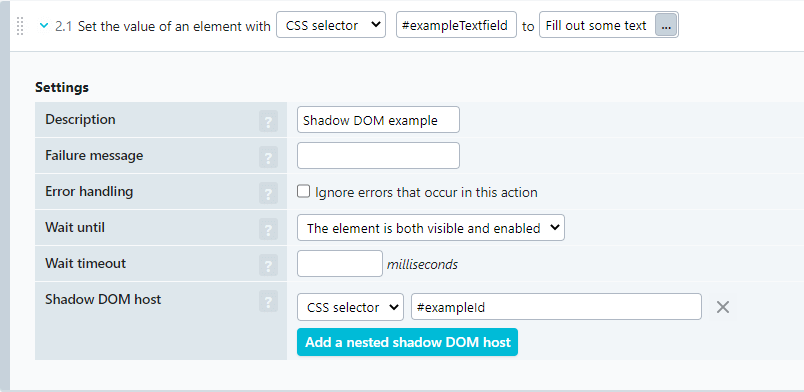
If the transaction needs a step that fills in a value into the text field, we’ll need to tell the transaction explicitly that it has to look inside the shadow DOM. To do so:
- Add an action of the correct type. In this example, we’ll be filling out some text, so we’ll use the Set action. The same steps apply for the other interaction types.
- In the settings for the action, click the button.
- Fill in the identifier for the shadow host element. In this case, we can refer to the shadow root element by its ID exampleId. When specifying a shadow host, you can use either a CSS (
#exampleId) or XPath (//example-root-element[@id='exampleId']) selector. - Now that we’ve told the transaction to look inside this particular shadow DOM, we can proceed as we normally would. Specify the element on which the Set action should take place. In this case, we’ll use the ID of the text field exampleTextfield. When specifying elements inside a shadow DOM, you can only make use of CSS selectors.
- Finally, fill out the text that should be set in the text field, and configure any other options as necessary.
If you’re using the transaction script editor (by clicking Switch to script in the top right corner of the step editor), that same action will look as follows:
{
"set": {
    "value": "Fill out some text",
        "element": {
            "css": "#exampleTextfield",
            "alternatives": [],
            "shadowRoots": [
                {
                "css": "#exampleId"
                }
              ]
            },
    "description": "Shadow DOM example"
    }
}
Nested shadow DOMs
In some cases, a shadow DOM may be nested within another shadow DOM. You can configure your transaction to handle this by simply adding another nested shadow DOM host, and entering the shadow DOM selectors in the order in which they appear.
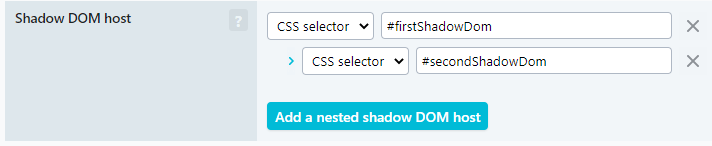
In the transaction script editor, simply add additional values to the shadowRoots array:
 "shadowRoots": [
    {
        "css": "#firstShadowDom"
    },
    {
        "css": "#secondShadowDom"
    }
]