The goal is to set up a new self-sufficient team in your Uptrends account. The setup consists of the following tasks:
- Create a new operator group
- Create a new monitor group and assign permissions
- Assign alerting and integration permissions
- Give access to relevant monitors only
- Assign specific monitor permissions
Tip: Use the table of contents “In this article:” (on the left) to quickly jump to one of the tasks.
Create a new operator group
To create the new group:
- Go to the menu .
- Click the Add operator group button in the “You have x operator groups” section.
- On the Main tab add a name for the operator group in Description. Use “Team A” for this example.
- Add all operators, that are already in your account and should be part of the team, to the operator group. To add an operator, simply check the box in front of the name. If the operators are not yet created, this is not an issue as they can be added to the group later, if necessary.
- Click at the bottom of the screen.
The new operator group called “Team A” exists now and has a number of operators assigned to it.
Create a monitor group and assign permissions
As “Team A” is new it has no permissions on other monitor groups and the members of “Team A” can only create new monitors which will be part of “Monitors A”. Therefore you have to make sure that you (as administrator) have added already existing monitors to “Monitors A”, as explained in Create the monitor group. It is the only thing that the team cannot do themselves.
Create the monitor group
The next step is to create a new monitor group that is managed by the new team.
- Go to the menu .
- Click the button at the top right.
- Enter a name for the monitor group in the Description. Use “Monitors A” for this example.
- From the list Monitors contained in this group at the bottom, add monitors to the group by expanding the group and checking the box in front of the monitor’s name. If the monitors are not yet in the account, these can still be added later by you or the new team.
- (Optional) Set the maximum number of monitors (per type) that may exist in the monitor group. If you don’t want to limit the number of monitors in the group, check the setting Allow unlimited monitors. Note that there can never be more monitors in the group than you have available in your account (see for what you have). However, monitors may reside in more than one group.
- Click at the bottom of the screen.
The new monitor group “Monitors A” containing a number of monitors is now available.
Assign permissions
At this point you have an operator group “Team A” and a monitor group “Monitors A”. However, the members of “Team A” are not yet able to maintain the monitors in the monitor group “Monitors A”.
To enable this you need to assign the right permissions. Take the following steps:
- Go to .
- Click the View all operator groups button.
- Select the operator group “Team A”.
- Go to the Permissions tab.
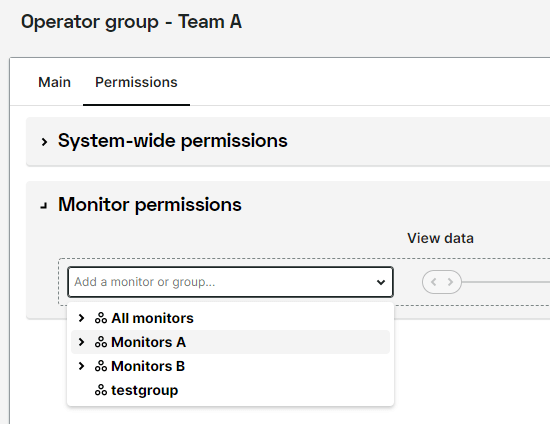
- In the section Monitor permissions, select the monitor group “Monitors A” from the list.

- In the row for “Monitors A”, move the slider to the Create and delete permission.
- Click the button at the bottom.
You have now given the operator group “Team A” the ability to create new monitors.
From now on a (general) administrator is not required anymore to create all the new monitors for the team. “Team A” can now manage their own monitors and create new monitors if needed.
Assign alerting and integration permissions
With an operator group and a monitor group in place “Team A” can set up the basis of monitoring. However, an important part of monitoring is alerting, to ensure that operators get notified and action is taken fast in case of issues. To this end, the team needs to be able to create and/or maintain alert definitions and integrations. As this is a setup for a self-sufficient team you are going to give “Team A” the permissions to manage themselves completely.
To assign the permissions for alert definitions and integrations to “Team A”:
- Go to the menu .
- Click the View all operator groups button in the “You have x operator groups” section.
- Click on the operator group “Team A”.
- Go to the Permissions tab.
- In the System-wide permissions section, select the permissions Create alert definitions and Create integrations.
- Click the button at the bottom left.
“Team A” now has the right to create alert definitions and integrations.
Assign permissions for existing alerting
With the newly added permissions the team can create their own alert definitions and integrations needed for their team to work. No administrator actions are required to maintain the alerting of the team. However, you might want to give the team access to alert definitions or integrations that existed before the team was added to your account. This is a task for an administrator.
To add “Team A” to existing alert definitions:
- Go to the menu .
- Click the View all operator groups button in the “You have x operator groups” section.
- Click on the operator group “Team A”.
- Go to the Permissions tab.

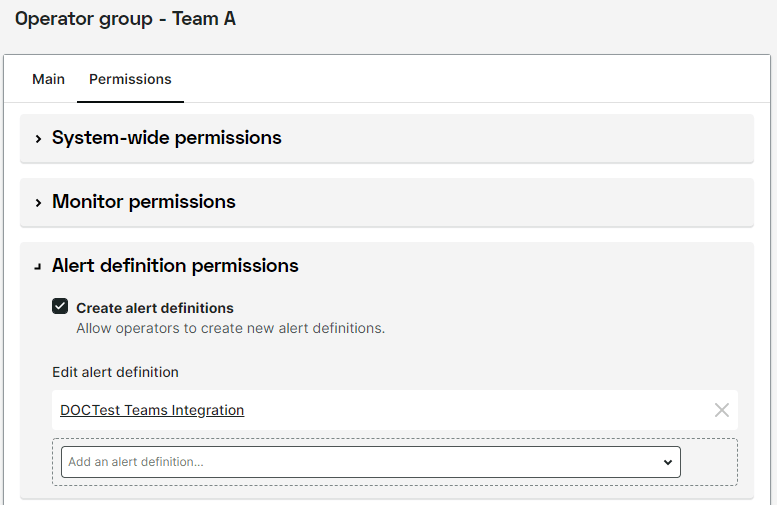
- In the Alert definition permissions section, use the drop-down menu to select and add all existing alert definitions that “Team A” should be able to manage.
- If you added a definition by mistake or if “Team A” should no longer manage that definition, click the x at the end of the line to revoke the permission.
- Click the button at the bottom.
To add “Team A” to existing integrations:
- Go to .
- Click on the integration that “Team A” should be able to use and/or edit.
- Go to the Permissions tab.
- Click the Add permission button.
- In the pop-up select the operator group “Team A” and select the permission you want to assign. Choose Use integration if the team should be able use the integration in an alert definition. Choose Edit integration if the team needs to fully maintain the integration, including the right to delete an integration.
- Click the Add button.
- Click the button at the bottom.
Repeat the above steps for all existing integrations that you want to give the new team access to.
“Team A” can now set up or change alert definitions and add integrations to them. Depending on your choice they may also be able to edit integrations.
Give access only to relevant monitors
In this exercise you are setting up a self-sufficient team and want the team to focus only on the monitoring data that is relevant to them. A little trick is needed to achieve this, here is why:
An Uptrends account always contains the “Everyone” operator group. All operators in your account are members of the “Everyone” group and by default they all have access to monitoring data of all monitors. You cannot delete the “Everyone” group and you cannot remove operators from the group.
The trick is to split the operators from “Everyone” into the (existing) group “Team A” and a new group “Main operators”.
You can then remove the permission to view all data for the “Everyone” group and set permissions for the individual groups (“Team A”, “Main operators”) as desired.
First create a new operator group “Main operators”:
- Go to the menu .
- Click the Add operator group button in the “You have x operator groups” section.
- On the Main tab add a name for the operator group in Description. Use “Main operators” here.
- Add all operators who should not be members of the new team (“Team A”). To add an operator, simply check the box in front of the name.
- Click at the bottom of the screen.
Then change the view permissions on the “All monitors” group:
- Go to the menu .
- Click the View all operator groups button in the “You have x operator groups” section.
- Select the operator group “Everyone”.
- Go to the Permissions tab.
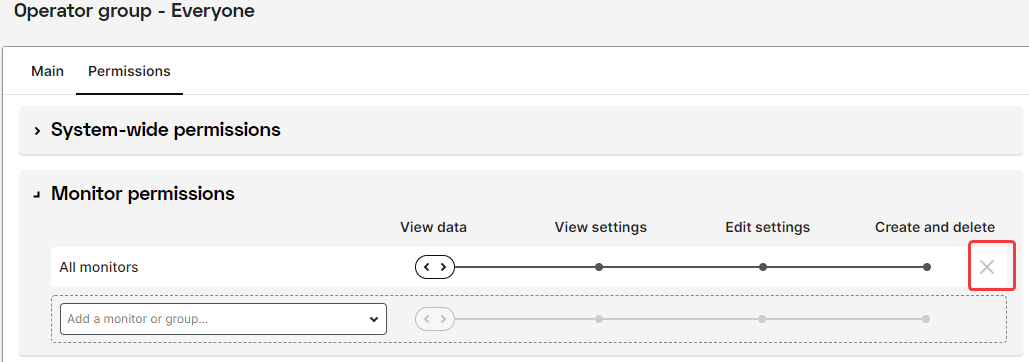
- In the Monitor permissions section, remove the row with “All monitors” (permission View data) by clicking the cross at the end of the row.

- Click at the bottom of the screen.
- Back in the Operator groups list, this time select the group “Main operators”.
- Go to the Permissions tab.
- In the Monitor permissions section, add the monitor group “All monitors” with the View data permission by choosing the monitor group from the list and moving the slider to the permission.
- Click at the bottom of the screen.
In the steps above you have removed the access to all monitor data for the “Team A” and then given back the original view data access to all other operators (members of “Main operators”) who are not members of “Team A”.
The result being that “Team A” has a limited view, seeing only monitors in monitor group “Monitors A” while all other operators still have the complete view, as before.
If an operator is a member of multiple operator groups they may see more, because the other operator groups can have their own permissions set.
Assign specific monitor permissions
With the settings so far you have a team that has a designated monitor group in which they can create and edit monitors and they can create alert definitions and integrations which they might need. So in essence they are self-sufficient and almost no administrator actions are required. However, it can be that the team needs to be able to see monitor data of other teams or need to be able to edit monitors of other teams as well.
To give the new team “Team A” access to other monitors you assign the required permissions to the monitor groups of the other teams. As an example, if there is a “Team B” with a monitor group “Monitors B”, you can open the operator group “Team A” and on the Permissions tab, in the Monitor permissions section, add the monitor group “Monitors B” from the list and give “Team A” the View data permission by moving the slider to that permission. By doing so “Team A” is able to view the monitoring data of “Team B”, but is not able to edit them. This way the teams can cooperate, while access is limited.