
To fill in relevant content for the fields in each outgoing alert message, the message body you define needs to contain so-called system variables. When you refer to a system variable in your message content, it is replaced by the appropriate content when Uptrends generates an alert. Using system variables allows you to write message definitions that meet the other system’s expectations. In this article, we’ll cover how to set up and use various variables in your outgoing custom integration messages. If you understand how to use variables in your custom integration, you might want to take a look at the complete list of available system variables.
Correct usage of variables
Let’s look at an example. An obvious piece of information that should probably be part of any alert message is a plain text description of the error that was detected by Uptrends. Suppose that the system you want to connect to has a field called “errordescription”. You could plug Uptrends' error description into that field by including this definition in your JSON-formatted message:
{ "errordescription": "{{@alert.description}}" }
In Uptrends' system variables, the text description of the error that triggers an alert is available in the {{@alert.description}} variable, so you simply put that variable right where you need it in your message. Similarly, you can use {{@alert.timestamp}} to refer to the time of the alert, {{@monitor.name}} to include the name of the monitor, and so on. All available system variables are listed in this knowledge base article.
Specifying variables per escalation level
When the Customize option is active in an integration, you can maintain one or more variables for that integration on the Main tab. The default setting for predefined integration variables (as indicated by Specify value here) is that the value for those variables is defined as a fixed value in the integration. You can subsequently refer to those variables in the message definition in the Customizations tab. For more information on how to define and use variables, please read this knowledge base article about using variables in a multi-step API setup. The exact same approach applies to integrations.
For integrations, however, you have one additional option that adds even more power. Suppose you’ve created an integration that connects to your IT management system. The integration sends information based on the monitor and alert that triggered the alert message. But, is that enough information for the IT management system to take appropriate action? You can send some additional information across about how to handle the new incident. You can typically express this information as: how should the incident be routed through the external system? Different alert definitions (each escalation level within them, in fact) can specify unique routing information, which you can include in the outgoing alert message.
To do this, define a variable in the Main tab of the integration, and choose Specify value in escalation level. Notice how you can no longer give it a value in the integration itself. Instead, when you use this integration in the escalation levels of your alert definitions, you can specify values for this variable there. As a result, you only need to create one single integration definition for your IT management system, while maintaining flexibility in the way that all alerts are handled there.
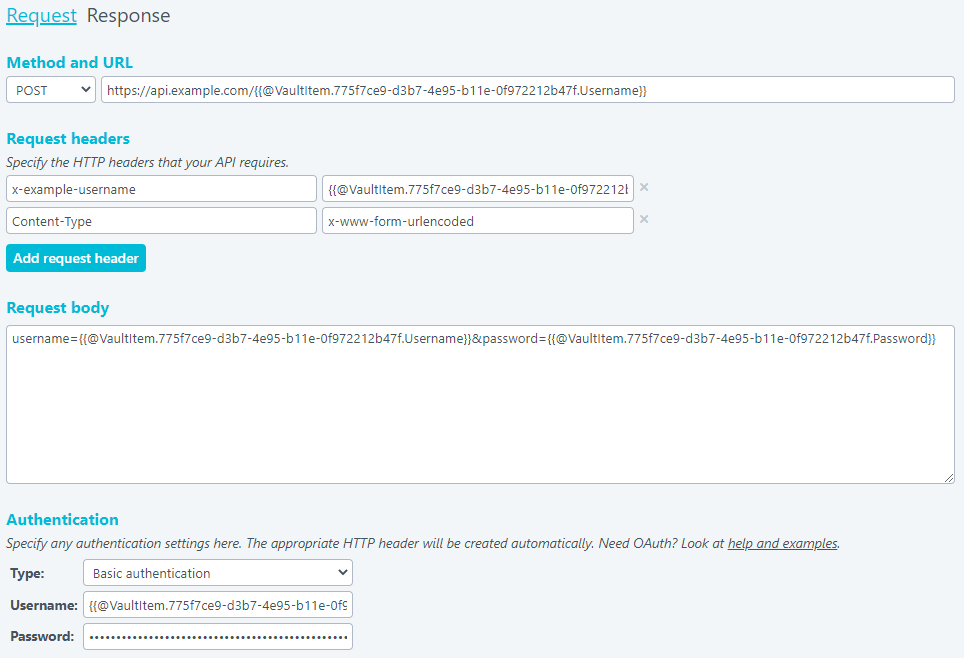
Using a credential set from the vault
It is possible to use vault credential set references at any point as part of the request body, request headers, or as the value for your username/password under Authentication. To refer to a vault item, use the following syntax: {{@VaultItem.<itemGuid>.Password}} (‘Username’ is obviously also valid). You can find the itemGuid for the credential set by navigating to it in your account vault, and reading its URL.
Including external IDs or custom data
When you’re integrating Uptrends with a third party system, it’s good to consider if there is a relationship between your Uptrends monitors and the resources (sometimes called components or services) you’ve defined in the third party system. The monitors in your Uptrends account have a name and a unique identifier (a monitorGuid), but those are typically not known in the third party system. The resources defined in the third party system probably have their own identifier too, which Uptrends doesn’t know about either.
If you want a monitor in Uptrends to trigger an incident for a specific resource on the other side, you need to define some sort of relationship between the two. In Uptrends, you can define that relationship by taking the identifier (or other important information) of the external resource/component and adding it as a custom value in the settings of a monitor.
As a result, the alerting data sent to the external system by Uptrends can include that identifier, so the receiving system knows which resource or component is affected by the incoming alert.
You can add custom fields in the Metadata section in the Main tab of a monitor. Aside from the external value you want to store, each custom field must also have a unique name so that we can refer to it in an alert message. For example, suppose your third-party system has the concept of Components, and each component has a ComponentId as its unique identifier. You’ll want to specify that ComponentId in the monitor settings in Uptrends, so the two can be linked together.
To do this, locate the Custom fields section in the settings of your monitor. Add a custom field by filling in “ComponentId” as the field name, and the appropriate external ID value (e.g., 7149488f-0b33-460d-85eb-210c0e80d7ba) as the field value. Click to store the new settings.
We can now make sure that the external value is sent across as part of the alert message by including it in the Request body of the outgoing message. You can use the {{@CustomField()}} function to refer to the custom field you just added. As an example, you could add this fragment to the request body:
{ "Component": "{{@CustomField(ComponentId)}}" }
Notice how the field name “ComponentId” we used in the monitor settings is literally included in the @CustomField() function call. When a real alert is triggered, this will generate the following content:
{ "Component": "7149488f-0b33-460d-85eb-210c0e80d7ba" }
The external system can use this value to create an incident for the appropriate component. This example uses just one custom field, but you can use multiple custom values if you choose.